
- Description
-

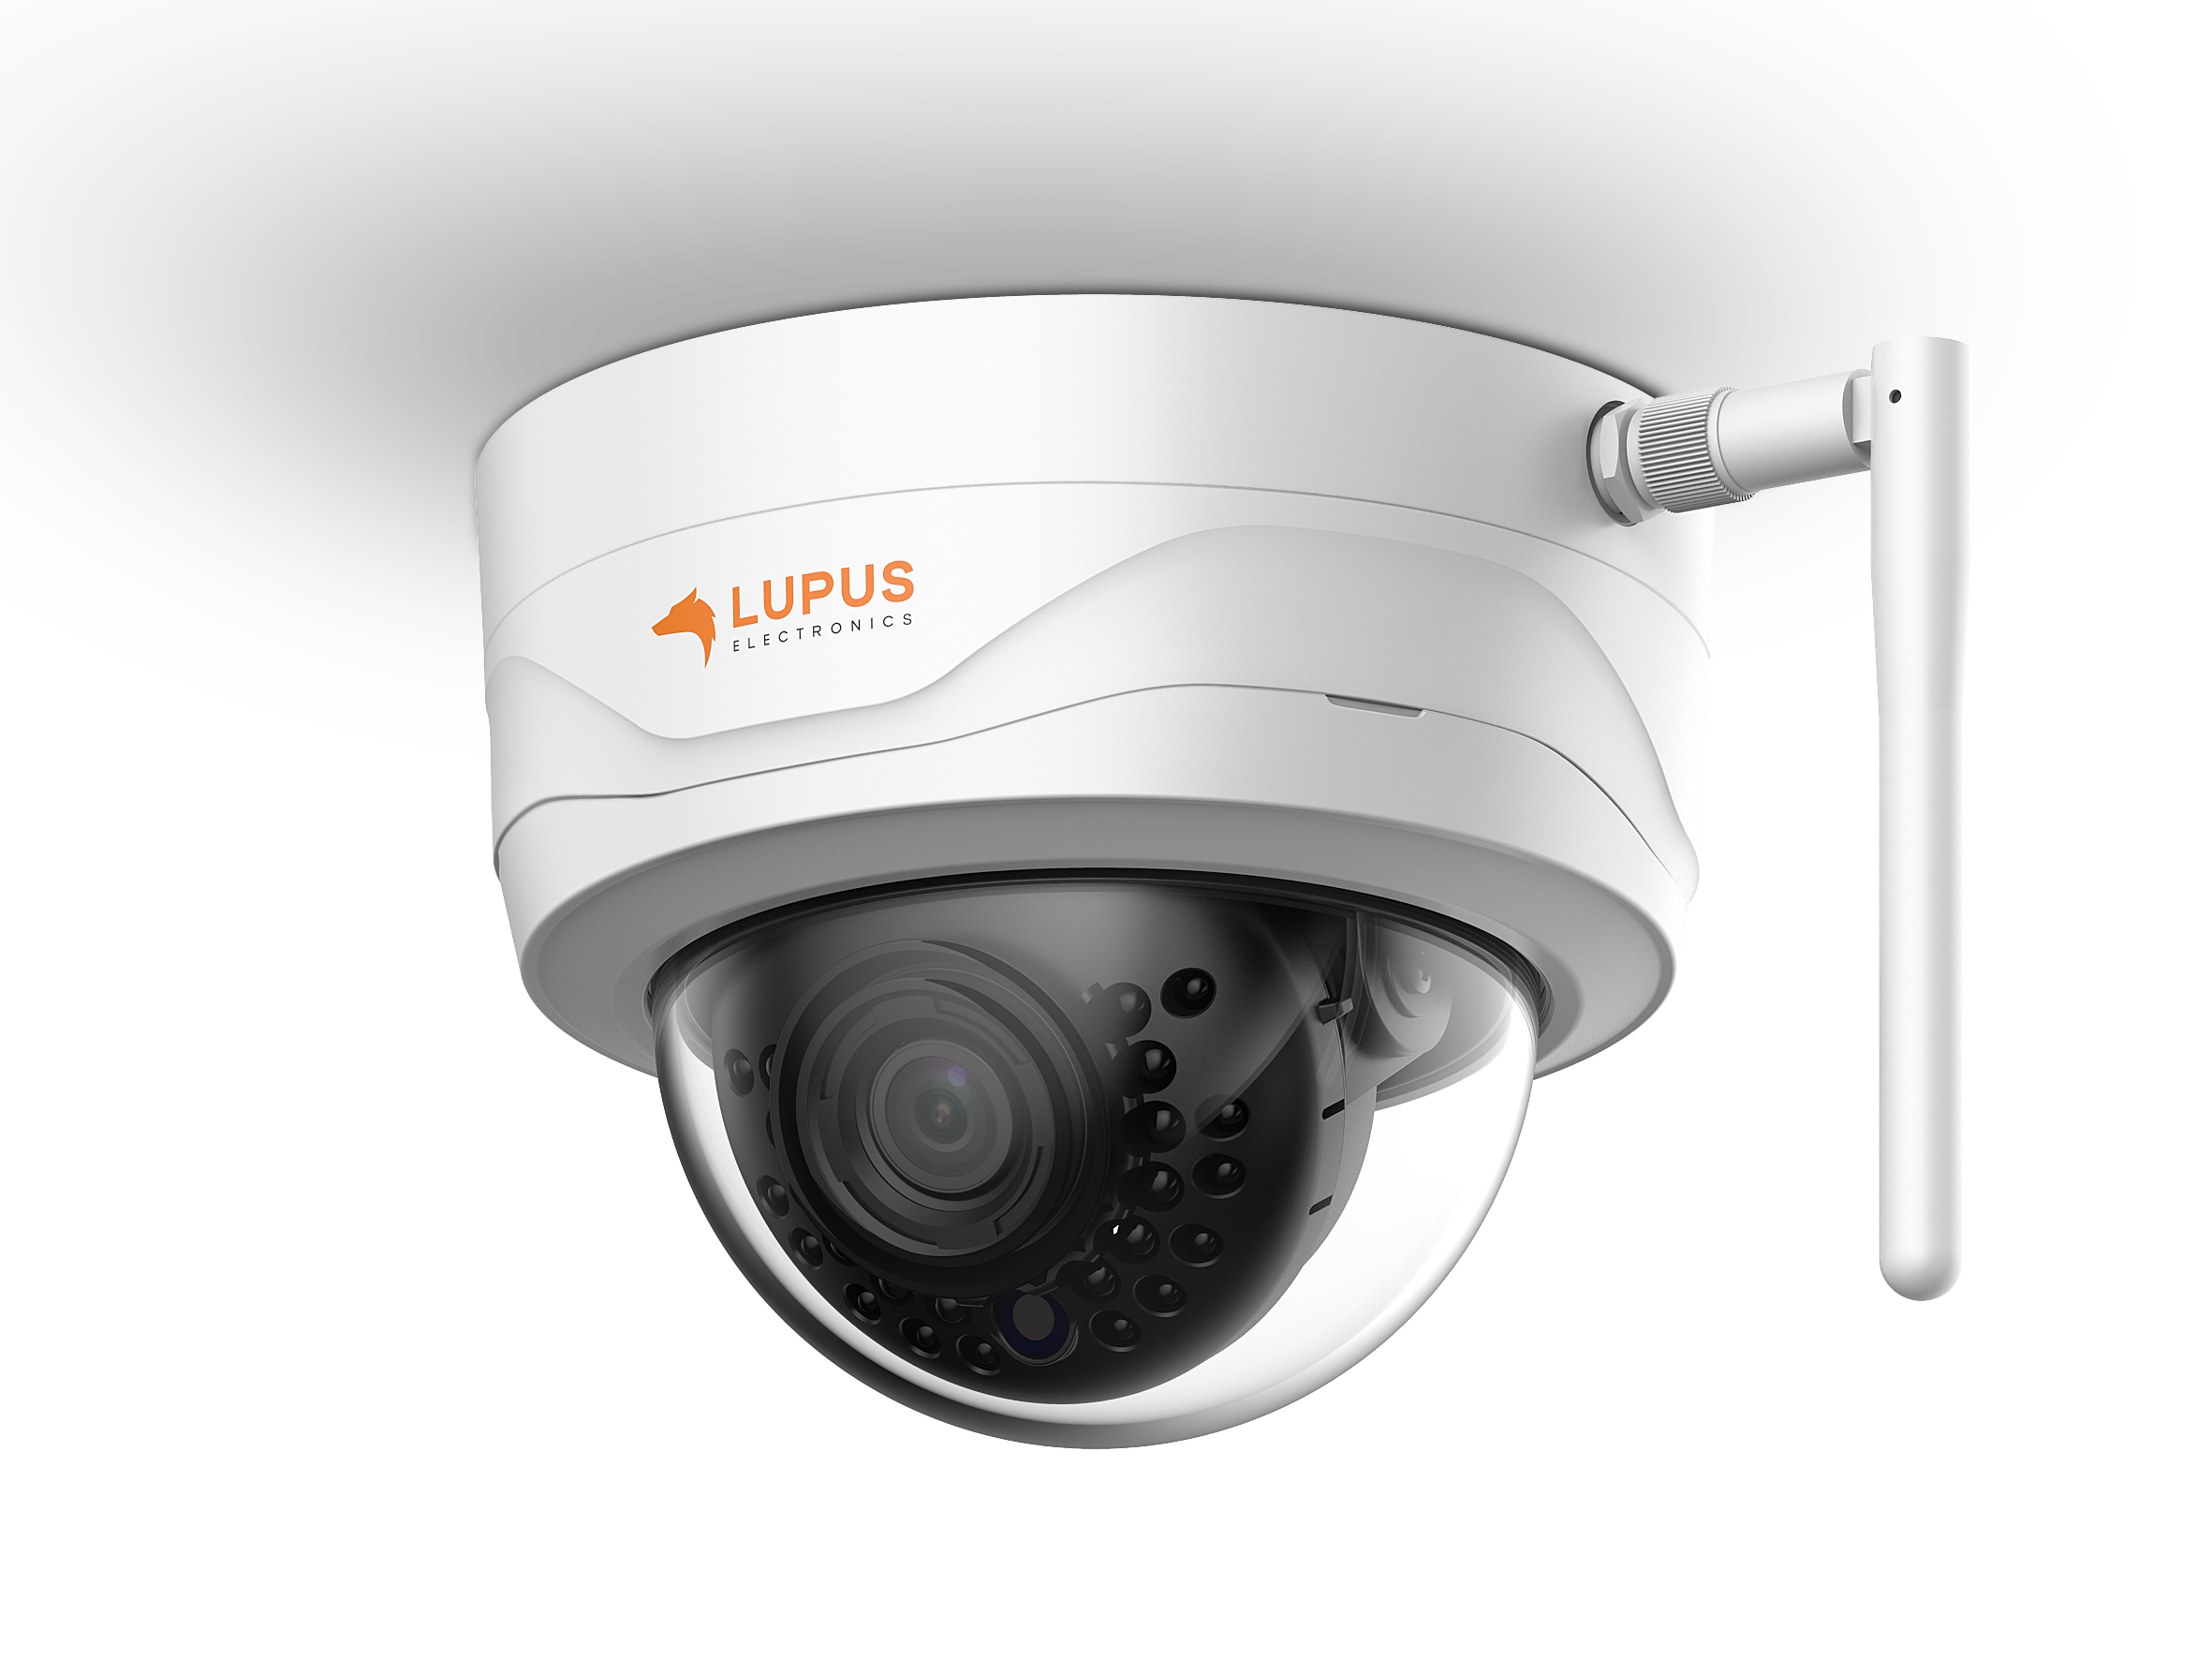
LUPUS - LE204 WLAN
The new standard for HD home security.
LUPUS - LE204. Keep track of the important things

Secure your home easy and efficient!
The LUPUS 204 is the new standard for HD video surveillance from the German manufacturer LUPUS-Electronics. A ultra-sensitive 4 megapixels image sensor that supports resolutions of up to 2560 x 1440 pixels, 97° wide angle lens, and 20m night-vision range turn this camera into the perfect solution for any project. Due to its sturdy dome chassis and protection class IP67 and IK10, you can use this camera at any location and in any weather – neither midsummer nor the depth of winter is a problem for this camera. Or in other words: A camera that leaves nothing to be desired.
Advantages of the LE204 WLAN

Easily and efficiently secure your home!
- High quality image sensor and signal processor
- HD resolution with night-vision and 97° angle of vision
- High quality aluminium chassis with micro-SD-card slot
- An easy-to-use app that allows you to access the live stream, as well as, the videos saved on the SD-card
- Integration into our LUPUS smart home alarm panel
- Software and design made in Germany
The IP camera LE204 is easy to install
The LE204 can easily be set-up via the free-of-charge iOS and Android app. An installation wizard guides you through the initial set-up and allows you to set-up a worldwide remote access to the camera without having to hassle with complicated network settings. You can connect the LE 204 via Ethernet cable and WLAN and features a very sturdy and weather resistant IP67 and IK10-chassis.

It is a complete security system and not an accumulation of isolated applications
Video surveillance helps you to prevent burglaries and allows you to solve a crime. However, a video surveillance system is not a substitute for a professional alarm system. You can integrate our cameras into our smart home alarm panel. Hence, if you receive an alarm by our alarm panel, you can immediately check your home or office. Also, you can control the cameras functions via the alarm system.
Free of charge: iOS and Android app

LUPUS allows you to be always at home.
The free "LUPUS" app for iOS and Android helps you to set-up your camera. An installation wizard guides you through the initial set-up and allows you to set-up a worldwide remote access to the camera without having to hassle with complicated network settings.
A single app for all devices: If you already own a LUPUS smart home alarm panel, you can integrate the LE 204 into your alarm panel. This allows you to check your home or office in case of an alarm. Simple and secure. LUPUS-Electronics. Security designed in Germany.
Included free of charge: the SmartVision software for MacOS and Windows
Multi-screen support: you can work with a single or several monitors. You can set-up the video streams via drag&drop / supports touch screen control / create your personal surveillance solution / all windows can be set-up dynamically

All in one
The app allows you to view the live video and audio stream, playback of your records, control, guard tours, and many more functions. In combination with our smart home alarm panels, you can automate the functions of the camera.

Not an isolated application
Integrated into our smart home alarm panels, LUPUS offers you a unified and thought-out security solution.

Easy installation and control
An installation wizard of the app guides you through the initial set-up. Our support team will help you if you have any issues.

Smart detection
The new motion detection results in less false alarms and allows you to find important events faster.
- Feuille
-
LUPUS - LE204 WLAN
Hardware
Image sensor High resolution colour 1/3" 4 megapixels CMOS sensor ICR Mechanical pivoted IR cut filter Resolution 20fps: 4MP (2560x1440) / 3MP(2048×1536)(2304×1296)
25fps: 1080P(1920×1080) / 720P(1280×720) / D1(704×576/704×480) / CIF(352×288/352×240)Angle of vision 97° horizontally, 52° vertically, f2.0, 2.8mm Night-vision rage Up to 20 meters
Up to 32 yardsStream Dual stream SD-card slot Yes, MicroSD up to 256 GB (not included) Electronic shutter Auto/manual, 1/3(4)s~1/100000s Backlight compensation BLC / HLC / DWDR White balance and gain control Auto/manual Minimal lighting conditions 0. 1 Lux/f2.0 (colour), 0 Lux/f2.0 (IR on) Wireless Wi-Fi(IEEE802.11b/g/n) Wi-Fi encryption WEP, WPA-PSK,WPA2-PSK WPS No Power over Ethernet (POE) No Power consumption DC 12V ~ 5.5W (IR on) Working environment -10°C to +50°C; < 95% humidity
-22F to 122F < 95% humidityDimensions 165mm (L) x 70mm ø;
6.49 inches (L) x 2.75 øProtection class IP67 (weather proof) Weight 470g (without packaging)
1.04 lbs (without packaging)Live view
Stream selection Mainstream / Substream Protocol selection TCP / UDP / Multicast Digital zoom Via mouse wheel Snapshot Take a snapshot of the livestream Triple snapshot Take three snapshots of the livestream Record Records the livestream of your local computer Help menu Help menu in the web ui explains the individual functions (question mark symbol) Adjust image (livestream) Brightness, contrast, hue, saturation Image size Original, adaptive, full-screen Image transfer Real-time, normal, adaptive Playback menu
File type mp4 / jpg Data source Internal SD-card Search options Month / year / calendar selection, colour-coded display if recordings are available on a certain day Alternative search via data list Lists all records of a selected day in tabular form Additional information (data list) Begin time, end time, file size Backup Direct download via the data list Setup - camera
Profile management Different profiles (day, night, normal) can be activated via a schedule Profile - conditions Each profile allows you to set-up different values for image, exposure, backlight compensation, gain, white balance, day&night switch, and IR lighting Image settings Mirror and flip the image in 90° steps Video settings Resolution, compression, frames per second, bit rate, bit rate type, I frame interval, watermark Snapshot settings Allows different settings for continuous or event triggered snapshots: image size (resolution), quality, interval (sec.) Overlay Privacy masking (four areas), camera name, date&time, text overlay Path Insert a path for records to your computer Setup - Network
TCP/IP Hostname, LAN/WLAN, DHCP or static IP, MAC address, IPv4, ARP ping, P2P on / off Port Up to 10 simultaneous connections (selectable between 1 and 20), TCP port, UDP port, HTTP port, RTSP port, HTTPS port, Flash port, ONVIF on/off DDNS On / off, Server: LUPUS (with automatic set-up), NO-IP, DYN-DNS, CN99 IP filter Blacklist on / off SMTP (E-Mail) On / off, Mail receiver (up to three), Snapshot attachment (between 1 and 5), TLS / SSL encryption Multicast On / off for main- and substream WiFi On / off, add SSID, search SSID, display connection status HTTPs On / off, create certificate, certificate settings, certificate installation, installed certificate Setup - Event
Motion detection On / off, Schedule (0 - 24h), Monday - Sunday, holiday, 6 schedules Area 4 areas (sensitivity and threshold are adjustable), intensity of a motion is displayed for easier setup Tampering On / off, schedule 0-24h, Monday - Sunday, holiday, 6 schedules, record on / off, record time after event (sec.), send E-Mail on / off, snapshot on / off Abnormality No SD card, SD card error, SD card capacity warning on / off, send E-Mail on / off Detect network disconnect, IP conflict on / off, record on / off, record time after event (sec.) Detect illegal access on / off, after 3 - 10 login attempts, send E-mail on / off Setup - Storage
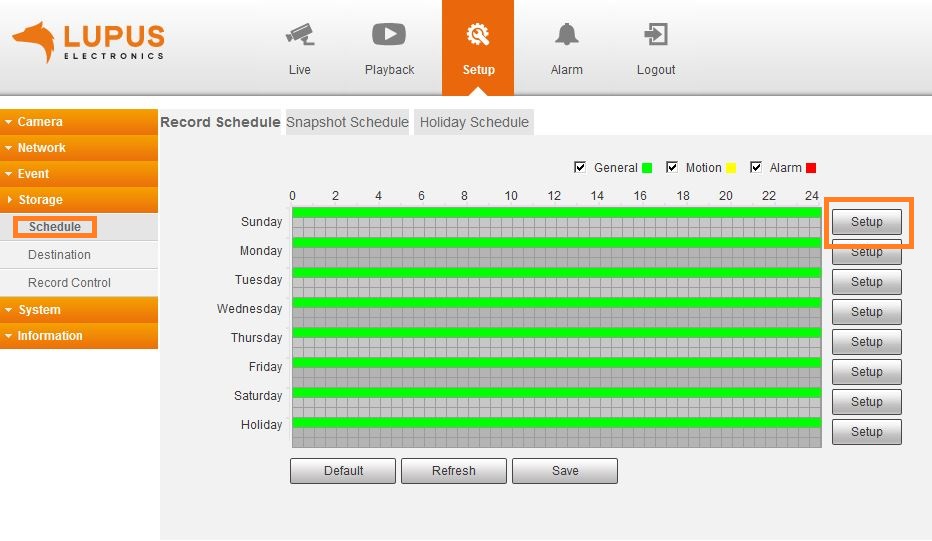
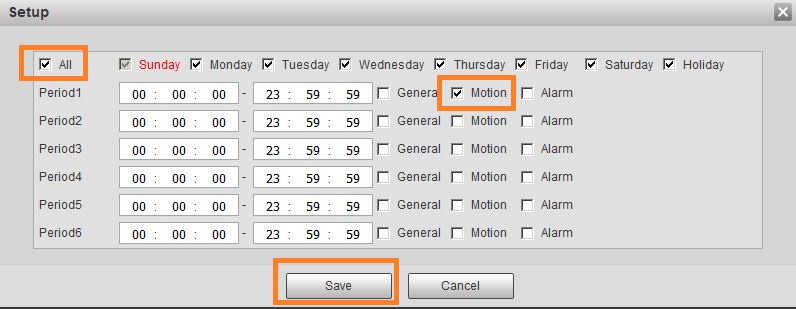
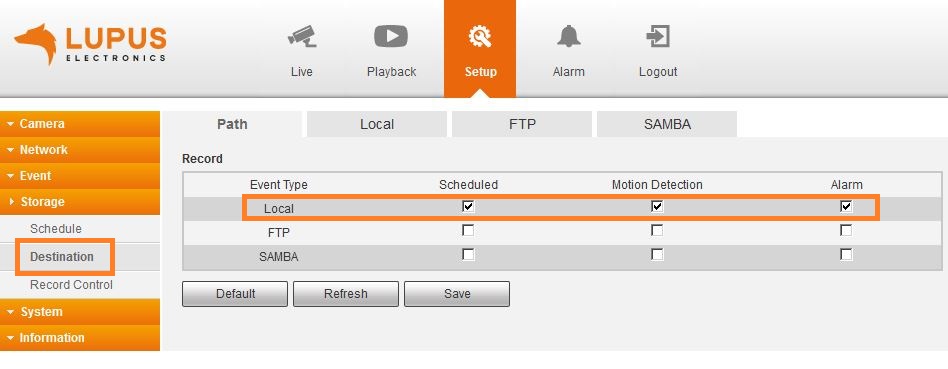
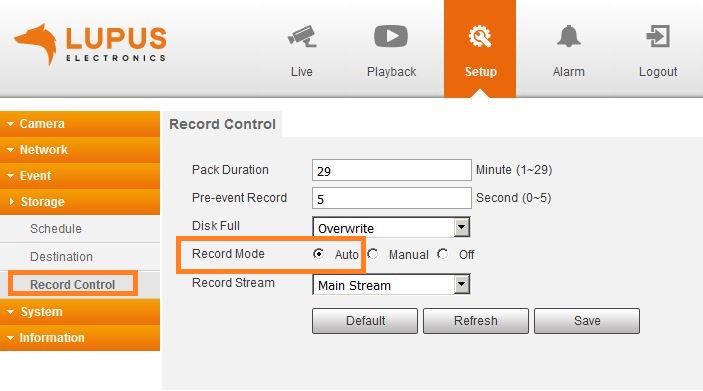
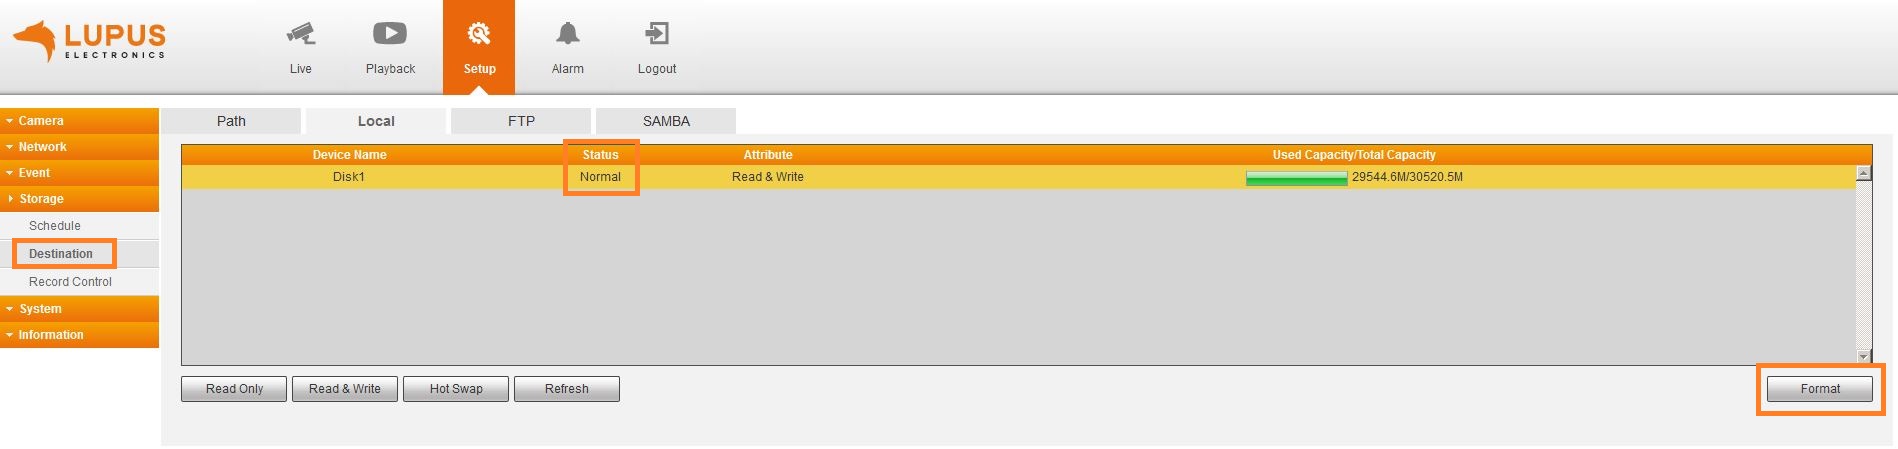
Schedule 6 record schedules for general (continuous) / motion detection / alarm record, Monday - Sunday, holiday, 0 - 24h 6 snapshot schedules for general (continuous) / motion detection / alarm record, Monday - Sunday, holiday, 0 - 24h Holiday settings record (on / off), snapshot (on / off) Destination Path for record and snapshot: local (SD card) Local: displays available local storage on the SD card, used / total capacity, read / write / read &write, hot swap Record control Pack duration (1-29m), Pre-event record (0-5) seconds, action on full SD card: overwrite / stop record, record mode: auto / manual / off, record stream: mainstream / substream Setup - System
General Device name, language (German / English), Video standard (PAL / NTSC), status LED on / off Date & Time, format, time zone, system time, DST (daylight saving time), NTP server Account Anonymous login on / off, add user, groups, up to 20 user, shows user rights Default Load default settings / load factory default Import / export Import / Export a backup file of your settings Maintenance Automatic reboot on / off / day / time, automatic delete olf records after selectable amount of days, manual reboot Upgrade Select a file for firmware upgrade Setup - Information
Version Firmware version, Web, Onvif version and serial number Log Displays the log of the camera, search via calendar with selectable filters Online user Displays currently logged in users with IP address and login time System requirements
Operating system XP, 2003, Windows 7, Microsoft IE 6.0 or later Recommended hardware Intel Dual Core 1.66G, RAM: 1024MB, graphic card: 128MB Required hardware Intel-C 2,8G, RAM:512MB, graphic card: 64MB Includes
LUPUS IP camera LE204 Software LUPUS SmartVision Manual Mains adapter 12V 1A Weather protection for Ethernet connector - Videos
-
- Téléchargements
-
DesignationTypeSizeDateDescriptionAktuelles Handbuch - LUPUS LE 202 + LE 204 V3 / LE 213PDF4.27 MB8.10.2025Aktuelles Handbuch - LUPUS LE 202 + LE 204 V3 / LE 213. Version 1.3Handbuch - Schnellinstallation LE 2xxPDF170 KB29.3.2021Handbuch - Schnellinstallation LE 2xxHandbuch - LUPUS LE2xxPDF4.52 MB8.4.2025Benutzerhandbuch v2.9 - Dunkles Firmwaredesign - Für Kameras: LE202 V2/LE204 V2/LE221 V1+V2/LE224 V1+V2/LE228 V1/LE232 V1Handbuch - LUPUS LE2xxPDF3.53 MB21.5.2021Benutzerhandbuch v2.4 - Helles Firmwaredesign - Für Kameras: LE201/LE202/LE203/LE204/LE221/LE224/228Software - Lupus IP Finder für WindowsZIP5.2 MB24.2.2022IP Kamera Finder zum Suchen, Einrichten und Updaten der Lupusnet HD Kameras, Rekorder + LUPUSEC Alarmzentralen Version 1.0.13Software - Lupus IP Finder für Mac OSPKG235 KB29.4.2021IP Kamera Finder zum Suchen und Einrichten der Lupusnet HD Kameras, Rekorder + LUPUSEC Alarmzentralen Version 1.3Software - SmartVision für Windows Version 2024ZIP82.07 MB29.10.2024Software - SmartVision für Windows V1.003.1005000.0.T.241021 Deutsch - Releasedatum 21.10.24Software - LUPUS SmartVision2 für MacOS VenturaGZ94.2 MB30.10.2023SmartVision Software für MacOS Ventura in Englisch. Vorraussetzung ARM Technonlogie!Software - DAV PlayerZIP12.52 MB31.3.2021DAV Player zum Abspielen von .dav-Dateien. V3.39.0.R.20160707Firmware - LUPUS LE 20X (Version 1)BIN13 MB17.7.2026Firmware 28R für LUPUS IP-Kameras LE201/202/203/204 (alte Version, Verkauf bis 2021)Firmware - LUPUS LE 20X (Version 2)ZIP26.69 MB3.6.2026Sicherheitsfix OHNE SMB-Speicherung. FW-Version 1005008.1R für LUPUS IP-Kameras LE202/204 (V2 - alte Kameraversion, Verkauf bis Mitte 2024)Firmware - LUPUS LE 20X (Version 3)BIN17.27 MB25.11.2025Version 4R für LUPUS IP-Kameras LE202/204 (V3 - neue Kameraversion)
- FAQ
-
Questions fréquemment posées - What do I have to do to get remote access to my Lupus device?
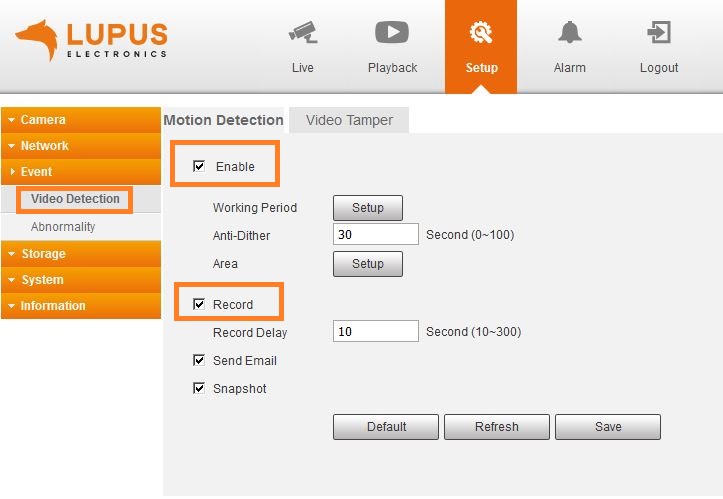
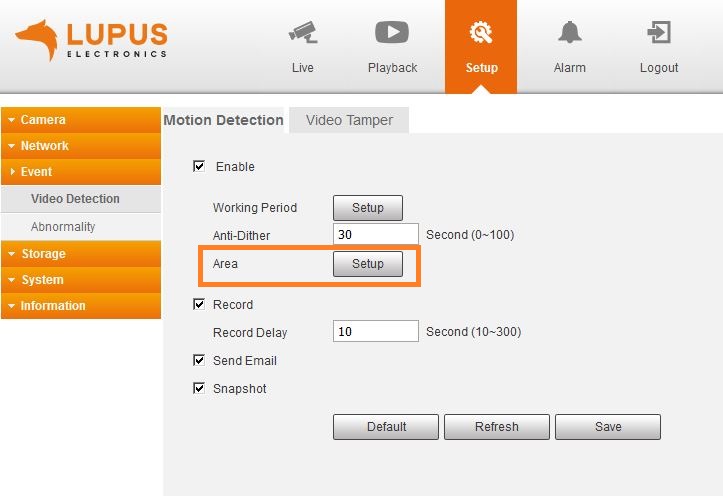
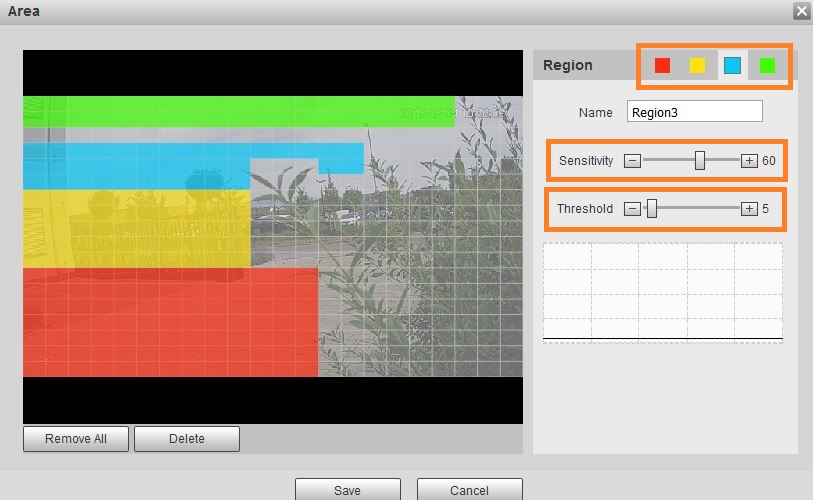
- LE 20x / 2xx - How do I set up the motion detection correctly
- Which App can I use?
- Why is the email notification not working?
- LE 20x / 2xx - How can I find the IP address of my camera or my recorder using Windows 10?
- LE 20x / 2xx - How do I integrate the live stream of my camera into my XT alarm panel?
- LE 20x / 2xx - Activate or deactivate the motion detection schedule for your camera via your XT alarm panel.
- How can I setup a Multiview in my app?
- Which camera supports which detection method (e.g. motion detection)?
- Why cant I see anything in night-vision? Why is the video overexposed?
- Which functions of my camera can be controlled by my XT alarm panel?
- How can I display my camera / recorder in Echo Show?
- How do I correctly set-up the time / daylight saving time?
- LE 20x / 2xx - Email Funktion per Automationsregel aktivieren / deaktivieren
- LE 20x / 2xx - How do I perform a factory reset ?
- LE 20x / 2xx - Wie kann ich über die Alarmanlage Aufnahmen der Kamera starten?
- What does error code #2154 indicate?
- What is the function of the buttons in the iOS App?

What do I have to do to get remote access to my Lupus device?
P2P connection
All current LUPUS devices support P2P connection. A port forwarding or DDNS address is no longer necessary if you use our app for the remote access.
Below the old and now longer necessary manuals if you still want to use port forwarding and DDNS:
How can I access my router? (Due to P2P now longer necessary)
In order to gain access to your devices via the internet, you have to set up a port forwarding in your router. In case you do not know the IP address of your router, you can find in the following way:
Windows PC MAC - Start the command interface
Type in "cmd" in the start menu (without quotation marks)- Type in “ipconfig”
- Standardgateway is the IP address of your router
- Open the system settings
- Click on network
- Select your current network connection (Ethernet or WLAN)
- The tab TCP/IP lists the IP address of your router
How do I set up a port forwarding in my router? (Due to P2P now longer necessary)
*Currently, there are only German manual availableHow do I access my device? (Due to P2P now longer necessary)
After you have created a port forwarding as described in the manuals above, you can access your device by typing in the following address in your web browser:
https://YourName.lupus-ddns.de:ExternalPortThe real command would look similar to the following:
https://demoxt2.lupus-ddns.de:53080
http://demoxt1.lupus-ddns.de:10000Which port do I need to forward in my router? (Due to P2P now longer necessary)
In the following table, the internal ports of our devices are listed:
Device Internal port XT1 / XT2 80 XT2 Plus 443 (SSL encrypted - recommended) or 80 (not encrypted) LE 9xx cameras 80 LE 200 80 (older firmware versions 88) LE 201 / LE 203 TCP 80, TCP 37777, TCP 1935, and UDP 37778 (see FAQ LUPUSTEC → General → "Required port forwarding for an access via internet") Recorder HDTV / NVR / HD-SDI TCP 80 and TCP 37777 and UDP 37778 (see FAQ LUPUSTEC → General → "Required port forwarding for an access via internet") Change the standard password of any device you allows to be accessed from the internet!
last updated - 27/11/2024 last updated - 16/02/2022 last updated - 17/03/2021 Why is the email notification not working?
General
Please make sure that your IP settings are correct. If you are in doubt, please set the alarm panel to DHCP.
Some routers have a list of secure e-mail servers (e.g. speedport of the German Telekom) that might block some e-mail providers if it is active. If your router has a similar function, please deactivate it.Which e-mail providers work with my XT?
We tested selected popular and free e-mail providers. If a provider is not listed, it only means that we did not test this provider – it does not mean that the provider does not work.
Provider XT1 XT1 Plus / XT2 (Plus) / XT3 / XT4 LE201/202/203/204 LE 9xx LUPUSTEC HDTV & NVR recorder Gmail +
smtp.gmail.com
(TLS Port 587) - allow access of less secure apps+
smtp.gmail.com
(TLS Port 587) - allow access of less secure apps+
smtp.gmail.com
(TLS Port 587) - allow access of less secure apps
Attachment: Yes+
smtp.gmail.com
(TLS Port 587) - allow access of less secure apps
Attachment: Yes+
smtp.gmail.com
(TLS Port 587) - allow access of less secure apps
Attachment: YesYahoo +
smtp.mail.yahoo.com
(SSL Port 465) - Allow apps that use less secure log in+
smtp.mail.yahoo.com
(SSL Port 465) - Allow apps that use less secure log in+
smtp.mail.yahoo.com
(SSL Port 465) - Allow apps that use less secure log in
Attachment: Yes+
smtp.mail.yahoo.com
(SSL Port 465) - Allow apps that use less secure log in
Attachment: Yes+
smtp.mail.yahoo.com
(SSL Port 465) - Allow apps that use less secure log in
Attachment: YesFreenet - +
mx.freenet.de
smtp e-mail sending needs to be enabled (protocol disabled)
Port 465 or 587+
mx.freenet.de
smtp e-mail sending needs to be enabled (protocol disabled)
Port 587 (TLS)
Attachment: Yes+
mx.freenet.de
smtp e-mail sending needs to be enabled (protocol disabled)
Port 587 (TLS)
Attachment: Yes+
mx.freenet.de
smtp e-mail sending needs to be enabled (protocol disabled)
Port 587 (TLS)
Attachment: YesMail.de - +
smtp.mail.de
Port: 465 SSL+ / -
smtp.mail.de
Port: 465 SSL
Attachment: No+
smtp.mail.de
Port: 465 SSL
Attachment: Yes+
smtp.mail.de
Port: 465 SSL
Attachment: YesGMX - +
mail.gmx.net
(TLS Port 587) - allow e-mails to be send by third party devices+
mail.gmx.net
(TLS Port 587) - allow e-mails to be send by third party devices
Attachment: Yes- +
mail.gmx.net
(TLS Port 587) - allow e-mails to be send by third party devices
Attachment: YesWeb.de - +
smtp.web.de
(TLS Port 587) - allow e-mails to be send by third party devices+
smtp.web.de
(TLS Port 587) - allow e-mails to be send by third party devices
Attachment: Yes- +
mail.gmx.net
(TLS Port 587) - allow e-mails to be send by third party devices
Attachment: YesOutlook / Hotmail - - - - - Telekom - +
securesmtp.t-online.de
(SSL Port 465) - You need to set a separate e-mail password
Not recommended for security reasons: Telekom does only allow you to send 100 mails per day (and not more than 1000 per month).+
securesmtp.t-online.de
(SSL Port 465) - You need to set a separate e-mail password
Not recommended for security reasons: Telekom does only allow you to send 100 mails per day (and not more than 1000 per month).
Attachment: Yes- +
securesmtp.t-online.de
(SSL Port 465) - You need to set a separate e-mail password
Not recommended for security reasons: Telekom does only allow you to send 100 mails per day (and not more than 1000 per month).
Attachment: YesWeb.de and gmx.de are owned by 1&1. Hence, 1&1 should work accordingly with the corresponding 1&1 smtp server.
Outh owns Yahoo and AOL. Hence, AOL should work like Yahoo with the corresponding AOL smtp server.
last updated - 20/05/2025 LE 20x / 2xx - How can I find the IP address of my camera or my recorder using Windows 10?
Please download the latest version of our IP Finder for Windows. The latest version (at least 1.0.9) allows you to find the cameras LE 201 / LE 203, as well as, our recorders on a computer running Windows 10.
last updated - 16/02/2022 LE 20x / 2xx - How do I integrate the live stream of my camera into my XT alarm panel?
Since firmware 3.0 the XT features a network search option. Simply start the network search in the menu "Smarthome" → "Camera", select your camera, and enter username and password.
A video manual (currently only in German) can be found hier.
Old method
NO LONGER NECESSARY WITH LATEST FIRMWARE
Open the menu "Network" -> "Cameras" in your XT alarm panel.
Enter a name for the camera and the following link and fill in the place holders.http://USERNAME:PASSWORD@IP-ADDRESS-OF-THE-CAMERA:PORT/cgi-bin/mjpg/video.cgi?channel=0&subtype=1
Beginning with the firmware with built date (10.8.2018), the following command is also possible (required for Chrome / Opera):
http://IP-ADDRESSE:PORT/cgi-bin/mjpg/video.cgi?channel=0&subtype=1&user=BENUTZERNAME&password=PASSWORTlast updated - 26/09/2025 LE 20x / 2xx - Activate or deactivate the motion detection schedule for your camera via your XT alarm panel.
Since firmware 3.0, the XT features this as a home automation action (menu "Smarthome" → "Automation"). Simply select your camera an define if you want to switch the motion detection on or off.
CGI-command
NO LONGER NECESSARY WITH LATEST FIRMWARE
Enter the following command into the action URL field of your alarm panel:- http://USERNAME:PASSWORD@IP-ADDRESS-OF-THE-LE201/cgi-bin/configManager.cgi?action=setConfig&MotionDetect[0].Enable=false
false = off
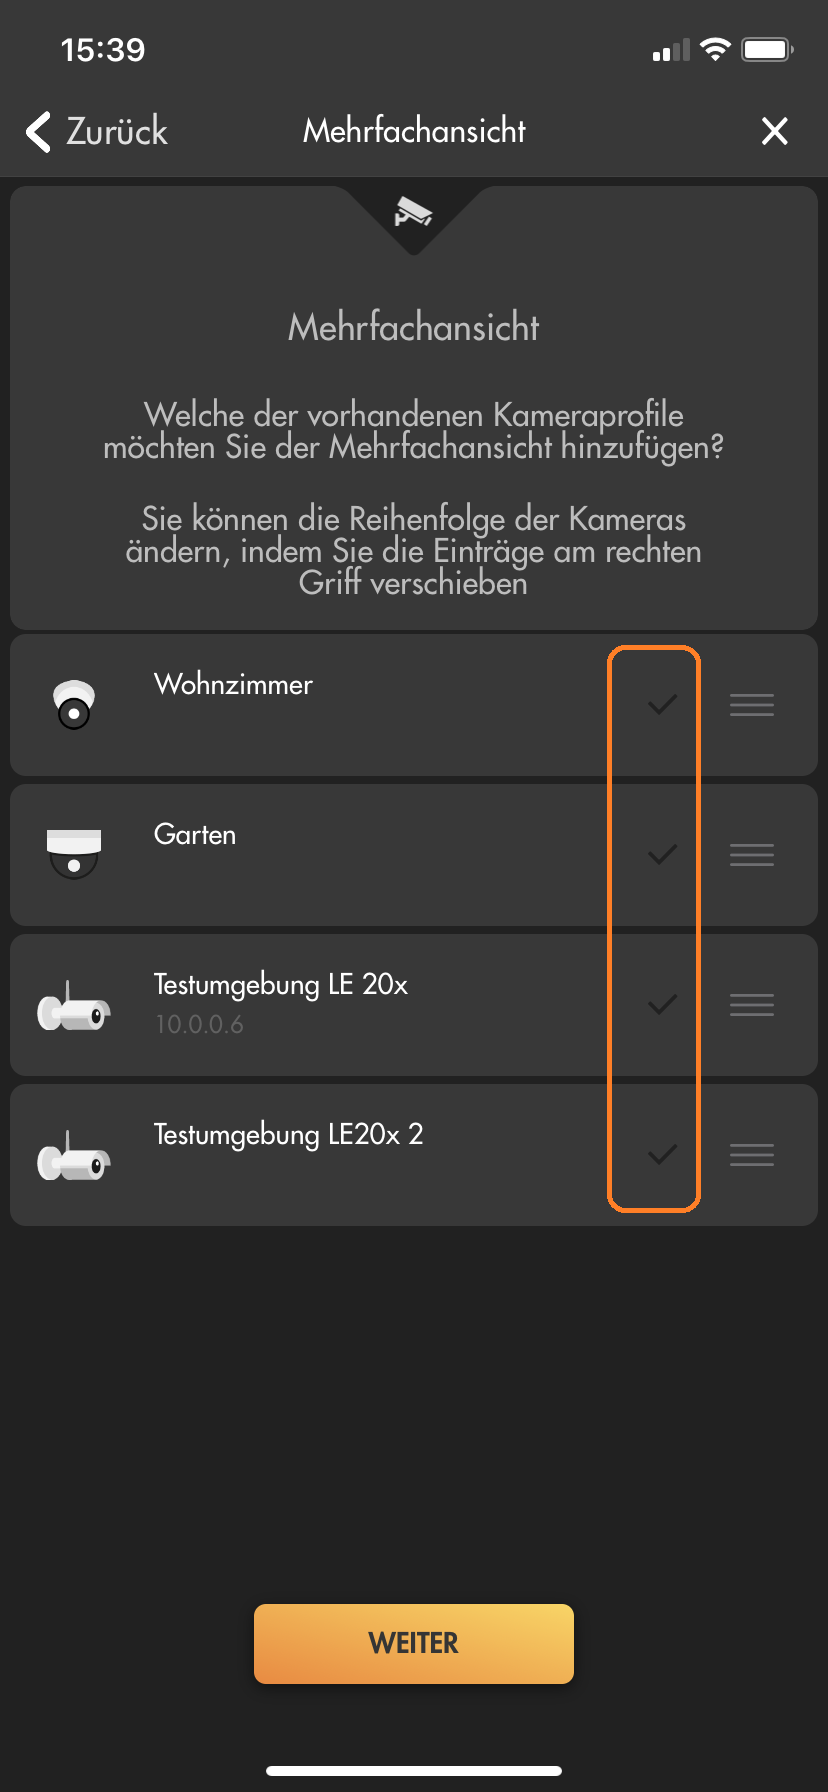
true = onlast updated - 26/09/2025 How can I setup a Multiview in my app?
Yes, you can set-up a Multiview in our iOS and Android App. In order to to so, please follow these instructions:
- Add all of your cameras as individual profiles to the app.
- Create a new profile in the app.
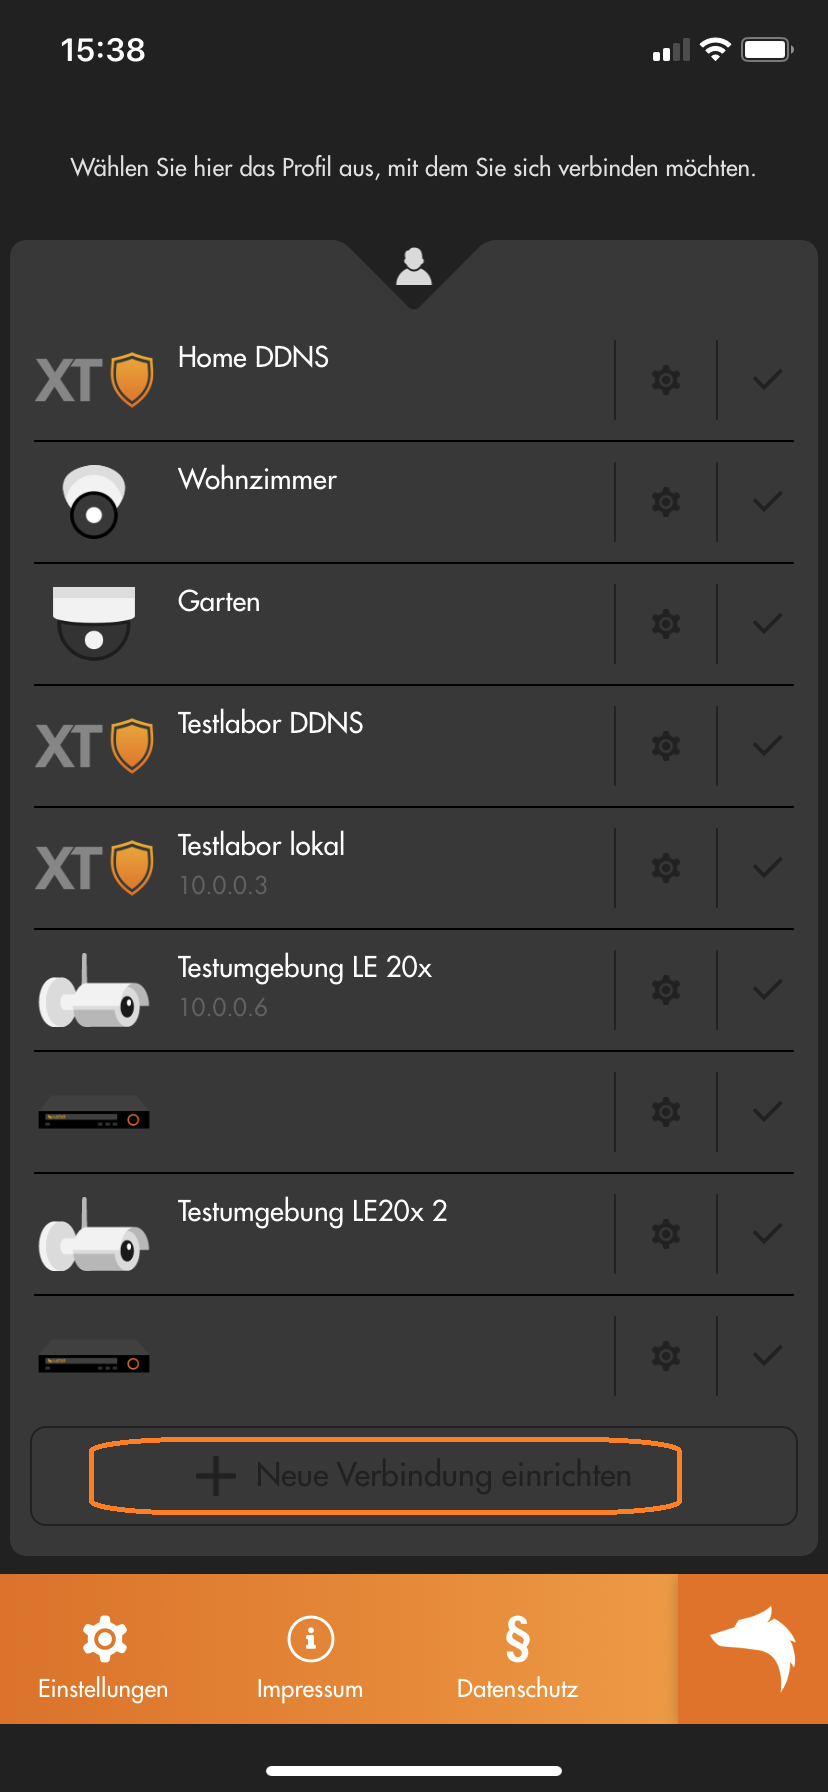
- Choose "Expert" or "Assistant".
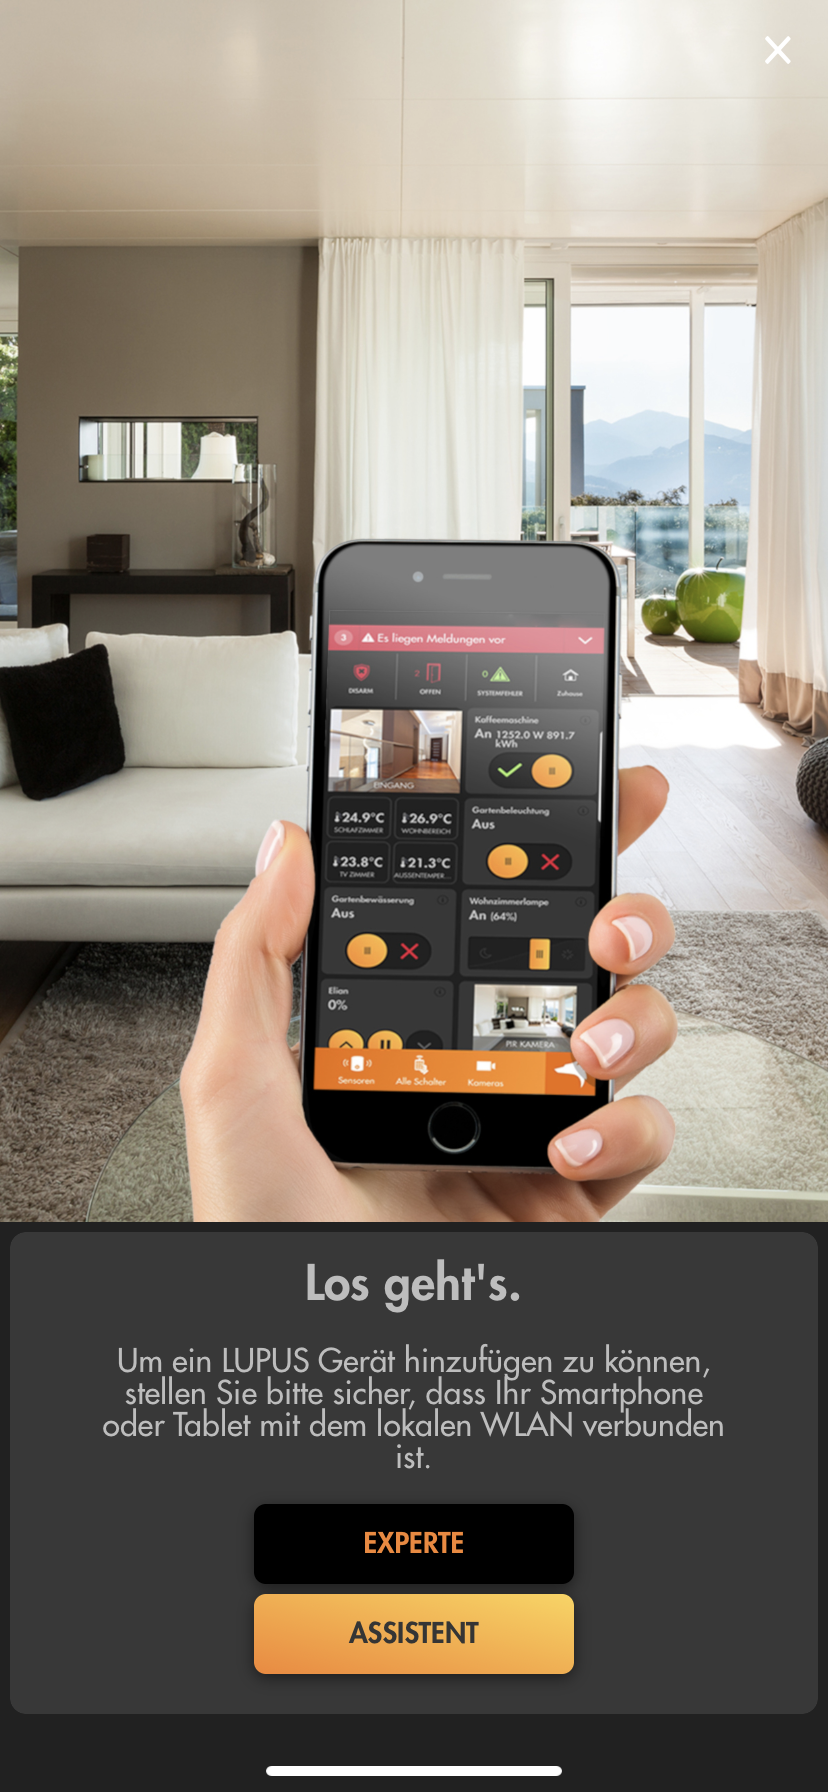
- If you chose "Expert":
- Select "Multiview" as the "Device type".
- Inset a "Name" for this Multiview and select the cameras you want to add to the Multiview.

- Klick on "Save".
- If you chose "Assistant":
- Insert a name for the Multiview profile.
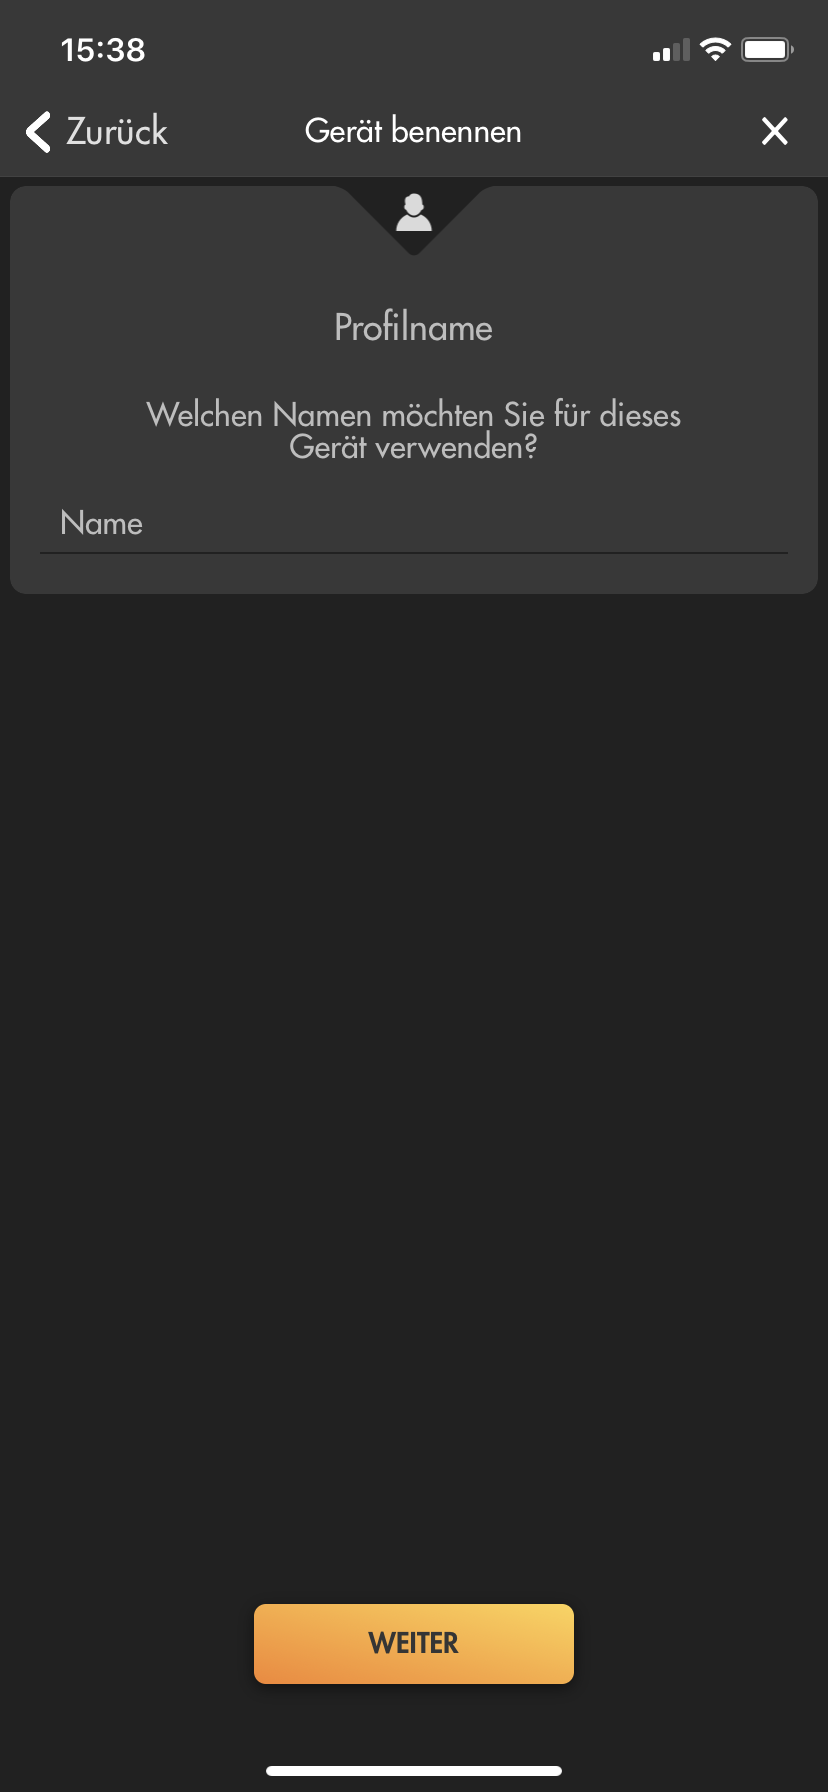
- Select "Multiview" as "Device type".
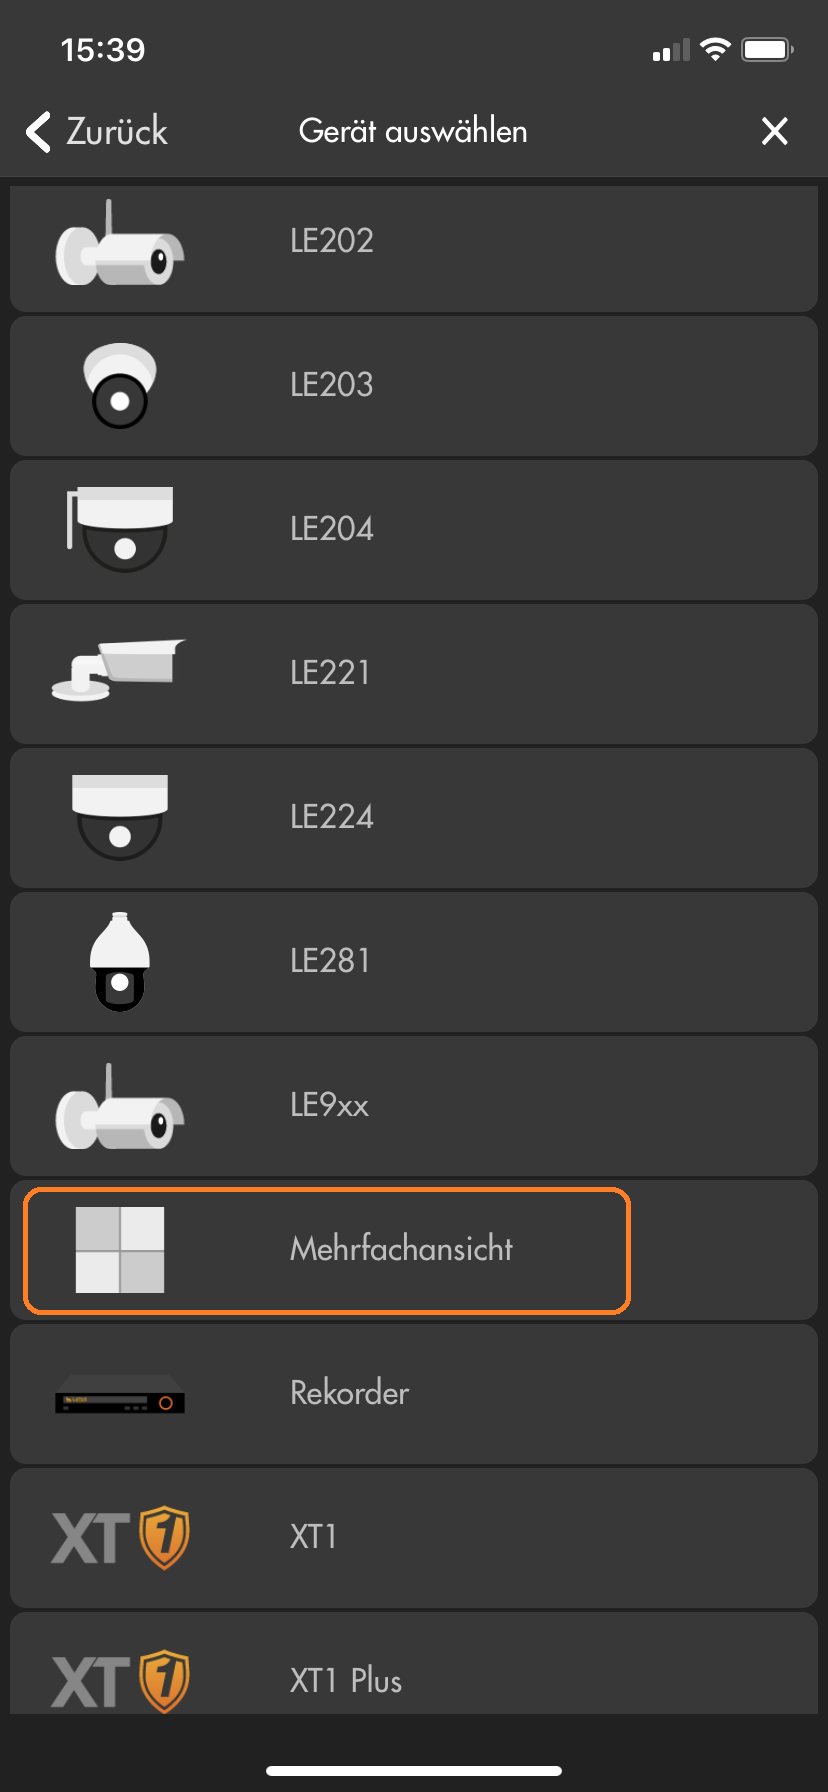
- Select the cameras you want to add to the Multiview.
last updated - 16/07/2020 Which camera supports which detection method (e.g. motion detection)?
Einfach Bewegungserkennung:
Die Kamera erkennt Bewegungen aufgrund von Änderungen der Pixel im Bild. Dafür stehen mehrere Filter zur Auswahl (4 Bereiche mit individueller Empfindlichkeit und Grenzwerten). Bei der einfachen Bewegungserkennung können auch Wettereffekte und leblose Objekte (z.B. Bäume / Äste) zu einer Auslösung der Bewegungserkennung führen. Hier finden Sie eine Textanleitung und eine Videoanleitung zur einfachen Bewegungserkennung unserer Kameras.Intelligente Bewegungserkennung V1:
Bei der intelligenten Bewegungserkennung V1 prüft eine KI in der Kamera, ob sich im einstellbaren Erkennungsbereich ein Mensch oder Fahrzeug bewegt. Die Erkennungsdistanz dieser KI liegt bei etwa maximal 6-12m (Reichweite und Zuverlässigkeit ist auch abhängig von Blickwinkel und Lichteinfall). Für eine Erkennung muss ein Mensch mindestens 160x160 Pixel im Bild ausfüllen und darf nicht größer aus zwei Drittel des Bilds sein (sowohl in Breite wie auch Höhe).Virtueller Grenzzaun:
Ein virtueller Grenzzaun erlaubt Ihnen Aufnahmen auszulösen, wenn ein Objekt mit einstellbarer Minimal- und Maximalgröße eine Linie überschreitet. Auch die Richtung der Linienüberschreitung ist einstallbar. Bestimmte Kameramodelle können auf diese Linienüberschreitung zusätzlich eine intelligente Bewegungserkennung anwenden und per KI weiter Filtern, ob es sich dabei um einen Menschen oder ein Fahrzeug gehandelt hat.Intelligente Bewegungserkennung V2 (neueste Version 2021):
Bei der intelligenten Bewegungserkennung V2 prüft eine KI in der Kamera, ob im einstellbaren Erkennungsbereich ein Mensch oder Fahrzeug bewegt. Die Erkennungsdistanz dieser KI liegt bei etwa maximal 26 (Mensch) /38m (Fahrzeug). Die optimale Erkennung eines Menschen findet ab etwa 6m statt. Die neue Version 2 der intelligenten Bewegungserkennungs-KI ist eine sehr große Verbesserung der KI der Vorgängerversionen mit annähernd 100% Genauigkeit bei der Erkennung von Menschen und Fahrzeugen. Für eine Erkennung muss ein Mensch mindestens 70x70 Pixel im Bild ausfüllen und darf nicht größer aus zwei Drittel des Bilds sein (sowohl in Breite wie auch Höhe). Hier finden Sie eine Anleitung zur Einstellung der intelligenten Bewegungserkennung unserer LE 232.Netzwerkkamera Einfache Bewegungserkennung Intelligente Bewegungserkennung V1 Virtueller Grenzzaun Intelligente Bewegungserkennung V2 (neueste Version 2021) LE 202 Ja Nein Nein Nein LE 203 Ja Nein Nein Nein LE 204 Ja Nein Nein Nein LE 221 Ja Ja Ja (inkl. Intelligente Bewegungserkennung V1) Nein LE 224 Ja Ja Ja (inkl. Intelligente Bewegungserkennung V1) Nein LE 228 Ja Ja Ja (inkl. Intelligente Bewegungserkennung V1) Nein LE 232 Ja Ja Ja (inkl. Intelligente Bewegungserkennung V2) Ja LE 281 Ja Ja Ja (inkl. Intelligente Bewegungserkennung V1) Nein Rekorder LE 918 4K / 926 4K Abhängig von der verwendeten Netzwerkkamera Abhängig von der verwendeten Netzwerkkamera Abhängig von der verwendeten Netzwerkkamera Abhängig von der verwendeten Netzwerkkamera LE 820/821 Ja Ja Ja (inkl. Intelligente Bewegungserkennung V1) Nein last updated - 04/01/2022 Why cant I see anything in night-vision? Why is the video overexposed?
Die Ausrichtung einer Kamera hat einen erheblichen Einfluss auf das Bild in der Nachtsicht.
Befindet sich ein Objekt vor der Kamera, reflektiert dieses das IR-Licht und wird dadurch in der Nachtsicht für die Kamera sichtbar. Ist das Objekt zu nah vor der Kamera, kann es zu einer Überbelichtung kommen. Eine solche Überbelichtung durch Hindernisse wird von der Kamera erkannt und die Kamera regelt automatisch die Stärke der IR-LEDs herunter. Dies sorgt dafür, dass man zwar das Hindernis sieht und dieses nicht überbelichtet ist, aber oft ein Großteil des restlichen Bildes unterbelichtet / zu dunkel ist.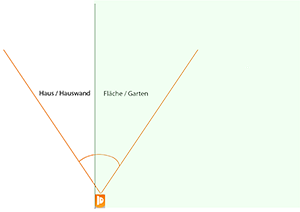
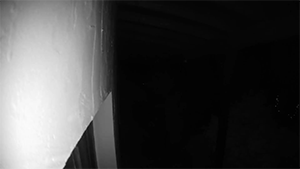
In diesen Bildern sehen Sie, dass die Kamera im 90°-Winkel entlang einer Wand ausgerichtet ist. Dadurch ist die Wand zu etwa 50 % im Fokus der Kamera und reflektiert auf kürzeste Distanz bereits das IR-Licht. Um eine Überbelichtung zu verhindern, regelt die Kamera die Stärke der IR-LEDs automatisch herunter. Dadurch ist die Wand sehr gut zu erkennen, aber im rechten Bereich des Bilds nichts mehr von der Fläche vor der Wand.
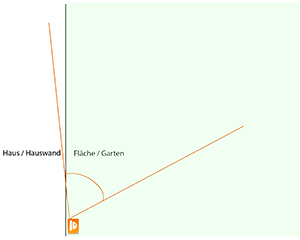
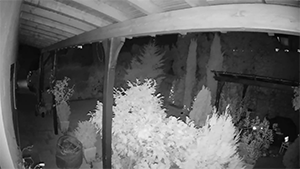
In diesen Bildern sehen Sie, dass die Wand nicht mehr für eine Überbelichtung sorgt – Sie sehen im Vergleich zum ersten Bild den Weg und den Garten.
Das Gebüsch und das Vordach sorgen als zu nahe Hindernisse (in diesem Fall unter 2 Meter Abstand) weiterhin dafür, dass die Kamera die IR-LEDs herunterregelt und der Hintergrund daher nicht komplett ausgeleuchtet wird / dunkler erscheint.Stellen Sie immer sicher, dass sich keine Hindernisse in kurzer Distanz vor der Kamera befinden. Jedes Hindernis egal ob Hauswand, Gebüsch, Baum oder ähnliches reflektiert das IR-Licht und kann dazu führen, dass die Kamera die Stärke der IR-LEDs verringert, um eine Überbelichtung zu verhindern.
Achten Sie bei der Überwachung Ihres Gebäudes darauf, dass die Hauswand nur einen geringen Teil des Bildes einnimmt.
In folgendem Video sehen Sie, wie sich die IR-Ausleuchtung in Abhängigkeit der Ausrichtung der Kamera ändert:
last updated - 24/03/2022 Which functions of my camera can be controlled by my XT alarm panel?
Funktionsübersicht XT1 Plus, XT2 (Plus), XT3, XT4 mit unseren verschiedenen Kameramodellen Kameramodell Bewegungserkennung an / aus E-Mailversand an/aus Daueraufnahme starten / stoppen Steuerbare Kamera kontrollieren:
PTZ Tour starten / stoppen
PTZ Postion anfahrenFlutlicht einschalten
Audiodatei abspielen
Kamerasirene auslösenIntelligente Bewegungserkennung an / aus Nutzerbar als Bedingung für Hausaution:
Bei Erkennung eines Menschen
Bei Erkennung eines Fahrzeugs202 Ja Ja Ja Nein Nein Nein Nein 203 Ja Ja Ja Ja Nein Nein Nein 204 Ja Ja Ja Nein Nein Nein Nein 221 Ja Ja Ja Nein Nein Ja (V1) Nein 224 Ja Ja Ja Nein Nein Ja (V1) Nein 228 Ja Ja Ja Nein Nein Ja (V1) Nein 232 Ja Ja Ja Nein Ja Ja(V2) Ja 281 Ja Ja Ja Ja Nein Nein Nein last updated - 20/01/2022 How can I display my camera / recorder in Echo Show?
Um unsere Kameras und Rekorder auch in Ihrem Alexa / Echo Show anzeigen zu können, gehen Sie bitte folgendermaßen vor:
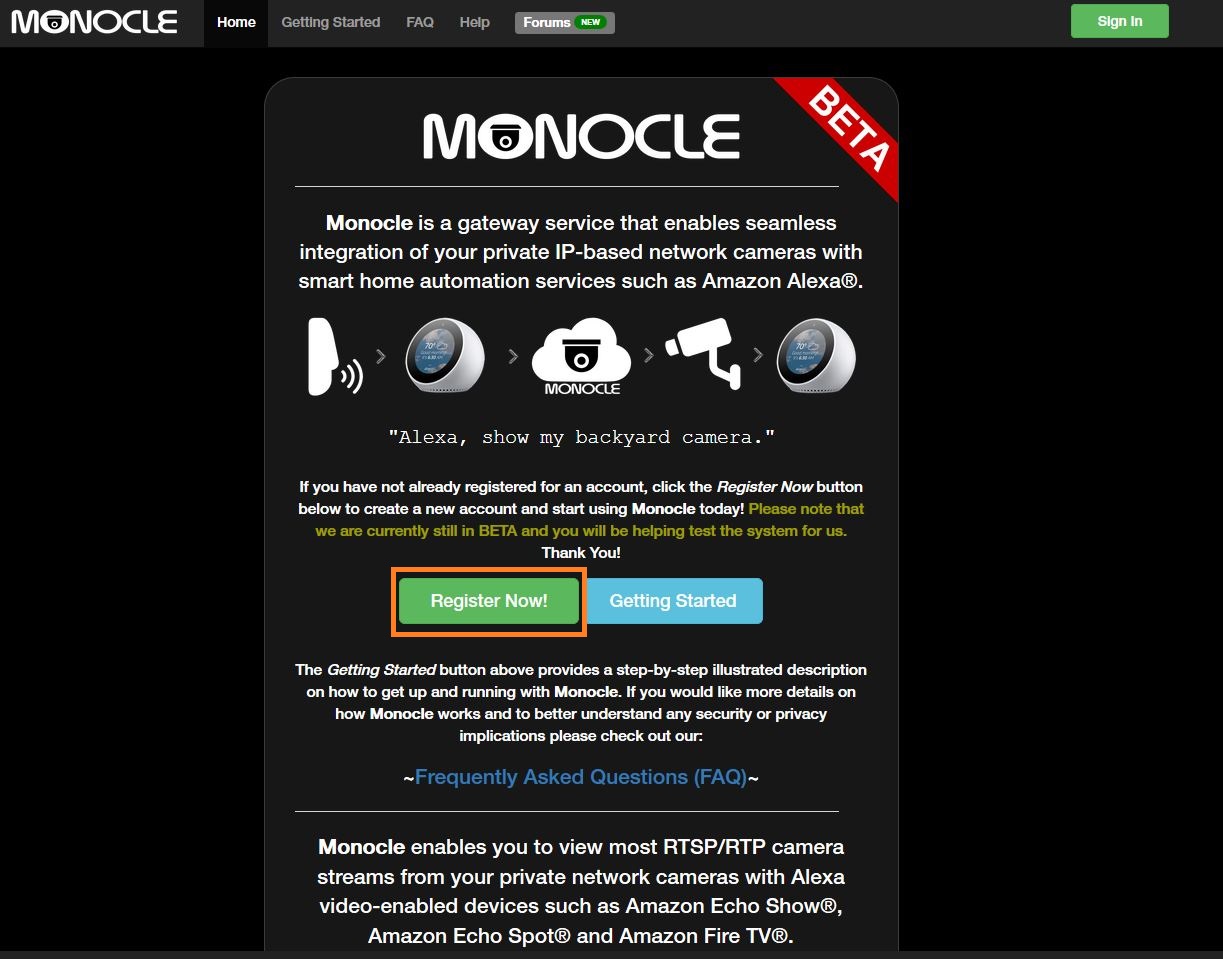
Bei einem "Echo Show 5" wird von Monocle ein Gateway benötigt. Hier finden Sie die offizielle Angabe von Monocle cam zu dieser Thematik.
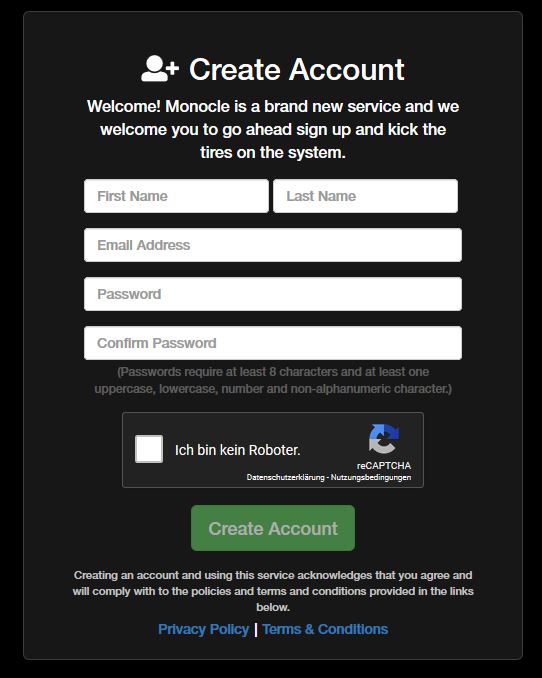
- Als erstes müssen Sie sich auf der Website www.monoclecam.com ein Konto erstellen (mittels "Register now")
- Nach der Registrierung erhalten Sie noch eine E-Mail auf der von Ihnen verwendeten Adresse. In dieser müssen Sie noch einmal bestätigen, dass Sie das Konto anlegen möchten.
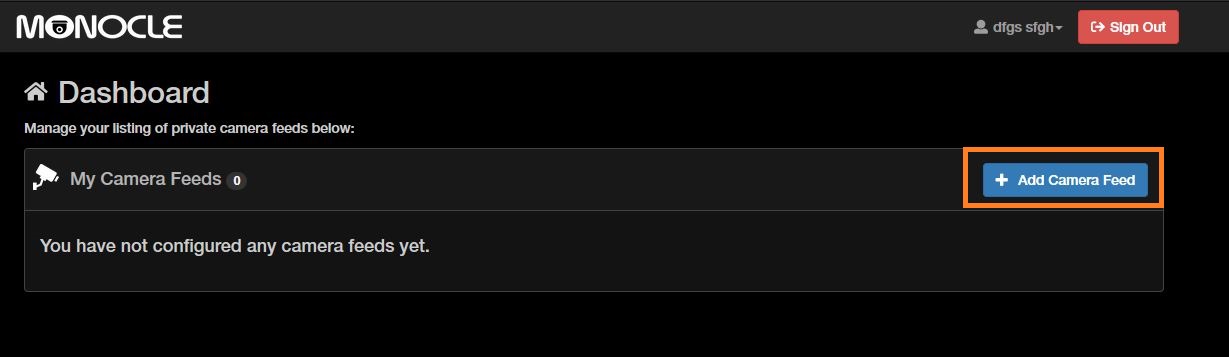
Wenn Sie sich dann per "Sign in" Angemeldet haben, sehen Sie folgende Oberfläche: - Durch klicken auf "Add camera feed" erscheint folgende Eingabemaske:
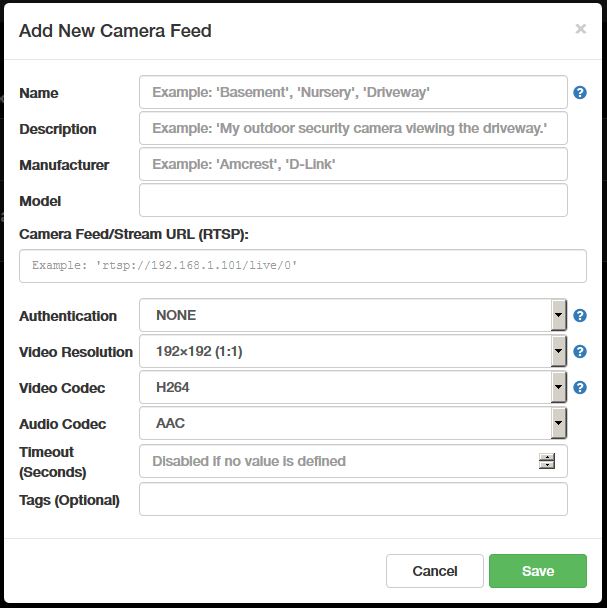
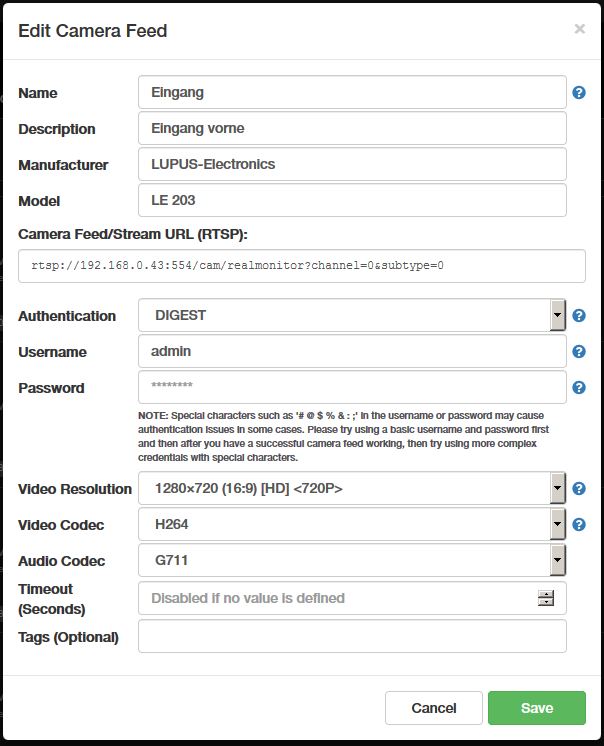
- Name: Name Ihrer Kamera (Rufname für Alexa)
- Description: Beschreibung um die Kamera besser zuordnen zu können
- Manufacturer: LUPUS-Electronics
- Model: LE 201
- Camera Feed/Stream URL (RTSP): rtsp://192.168.0.43:554/cam/realmonitor?channel=1&subtype=0
IP Adresse auf die Ihrer Kamera anpassen - Authentication: DIGEST
- Username: Benutzername Ihrer Kamera
- Password: Passwort Ihrer Kamera
- Video Resolution: "1280x720 (16:9) [HD] <720p>" (bzw. die Auflösung auf welche Sie die Kamera eingestellt haben.
- Audio Codes: "G711" (nur bei LE 203)
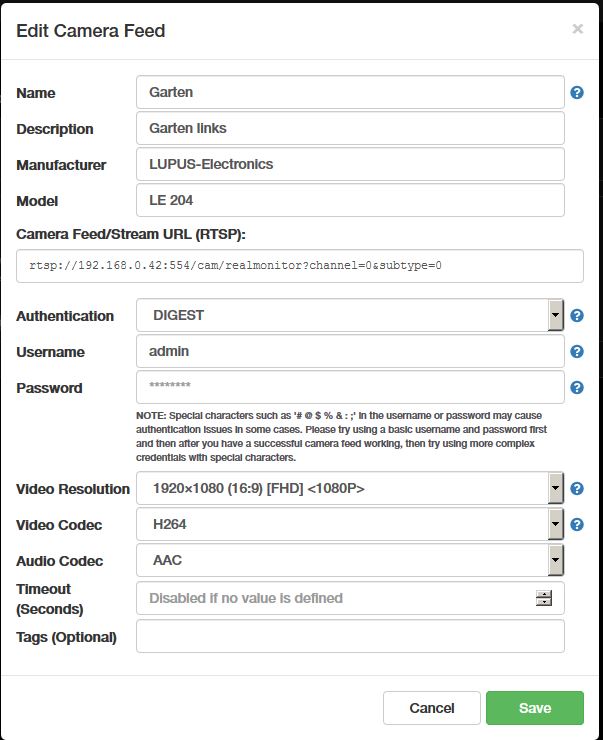
- Name: Name Ihrer Kamera (Rufname für Alexa)
- Description: Beschreibung um die Kamera besser zuordnen zu können
- Manufacturer: LUPUS-Electronics
- Model: LE 201
- Camera Feed/Stream URL (RTSP): rtsp://192.168.0.43:554/cam/realmonitor?channel=1&subtype=0
IP Adresse auf die Ihrer Kamera anpassen - Authentication: DIGEST
- Username: Benutzername Ihrer Kamera
- Password: Passwort Ihrer Kamera
- Video Resolution: "1920x1080 (16:9) [FHD] <1080P>" (bzw. die Auflösung auf welche Sie die Kamera eingestellt haben.
- Audio Codes: AAC (nicht relevant da kein Audio möglich)
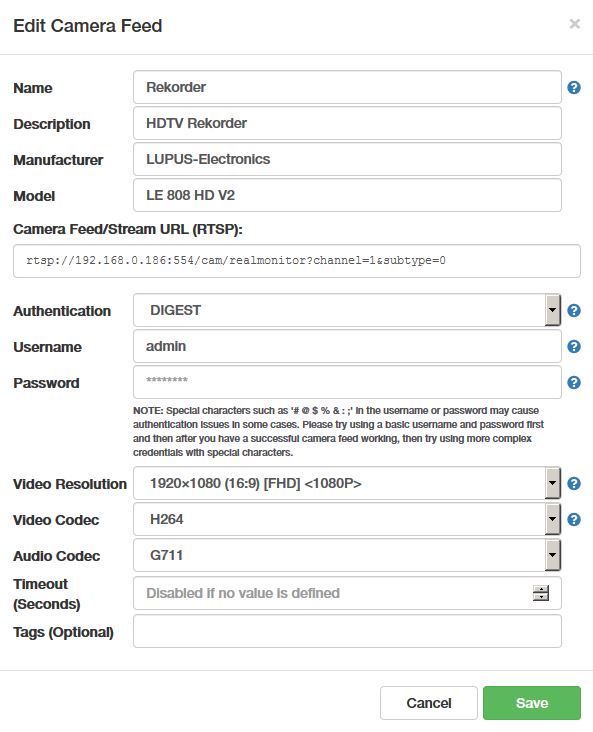
- Name: Name Ihres Rekorders (Rufname für Alexa)
- Description: Beschreibung um die Kamera besser zuordnen zu können
- Manufacturer: LUPUS-Electronics
- Model: LE 808 HD V2 (bzw. passender Name des Rekorders)
- Camera Feed/Stream URL (RTSP): rtsp://192.168.0.43:554/cam/realmonitor?channel=1&subtype=0
IP Adresse auf die Ihres Rekorers anpassen - Authentication: DIGEST
- Username: Benutzername Ihrer Kamera
- Password: Passwort Ihrer Kamera
- Video Resolution: Die Auflösung auf welche Sie die Kamera eingestellt haben.
- Audio Codes: "G711"
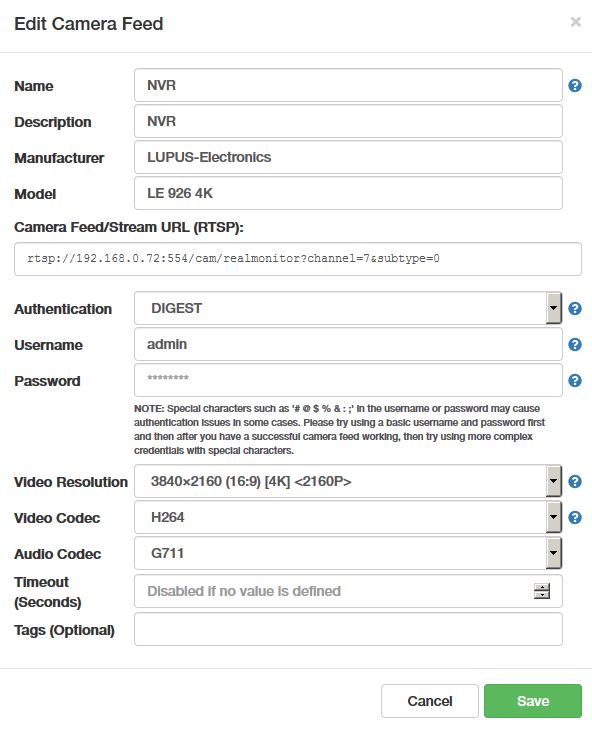
- Name: Name Ihres Rekorders (Rufname für Alexa)
- Description: Beschreibung um die Kamera besser zuordnen zu können
- Manufacturer: LUPUS-Electronics
- Model: LE 926 4K (bzw. passender Name des Rekorders)
- Camera Feed/Stream URL (RTSP): rtsp://192.168.0.43:554/cam/realmonitor?channel=1&subtype=0
IP Adresse auf die Ihres Rekorers anpassen - Authentication: DIGEST
- Username: Benutzername Ihrer Kamera
- Password: Passwort Ihrer Kamera
- Video Resolution: Die Auflösung auf welche Sie die Kamera eingestellt haben.
- Audio Codes: "G711"
- Als nächstes müssen Sie in Ihrer Alexa App nach dem "monocle" Skill suchen und diesen aktivieren.
Nach der Aktivierung müssen Sie die E-Mailadresse und das Passwort eingeben, mit welchem Sie sich auch www.monoclecam.com registriert hatten. - Wenn der Skill erfolgreich hinzugefügt wurde, klicken Sie links oben auf "Fertig" und beim Fenster danach können Sie auf "Geräte erkennen" klicken (dies dauert etwa 20 Sekunden).
- Der Monocle Skill wird Ihnen nun alle Kameras anzeigen, welche Sie Ihrem Monocle Konto hinzugefügt haben.
- An Ihrem Alexe / Echo Show können Sie nun durch Sprachbefehl "Alexa zeige Kamera [Kameraname]" Ihre Kamera Aufrufen und mittels "Alexa beendet Kamera [Kameraname] die Livebildwiedergabe beenden"
Für unsere Beispiele oben wären die Befehle also:- Zum Starten:
- "Alexa zeige Kamera Eingang"
"Alexa zeige Kamera Garage"
"Alexa zeige Kamera Garten"
usw.- "Alexa Beendet Kamera Eingang"
"Alexa Beendet Kamera Garage"
"Alexa Beendet Kamera Garten"
usw.
- LE 201 / 203:
- LE 202 / 204:
- HDTV Rekorder
- NVR
last updated - 30/09/2019 How do I correctly set-up the time / daylight saving time?
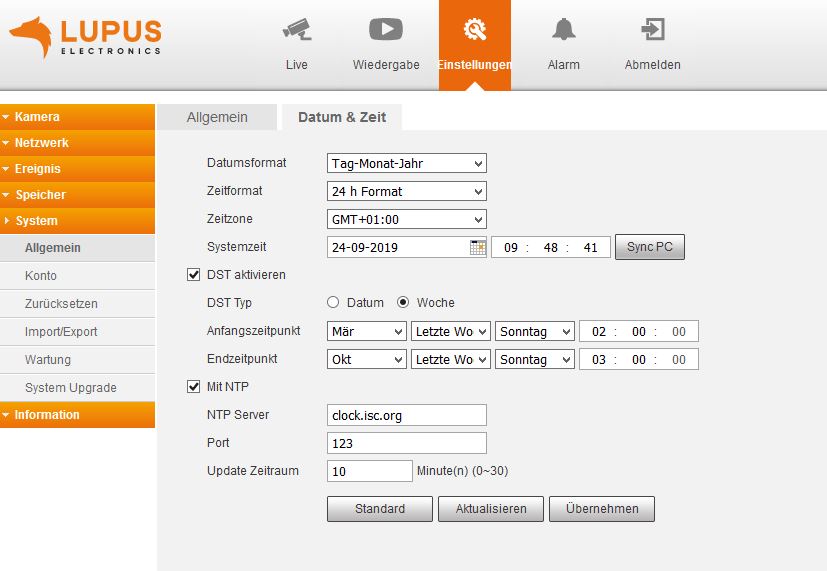
LE20x and recorder
Please use the following settings:
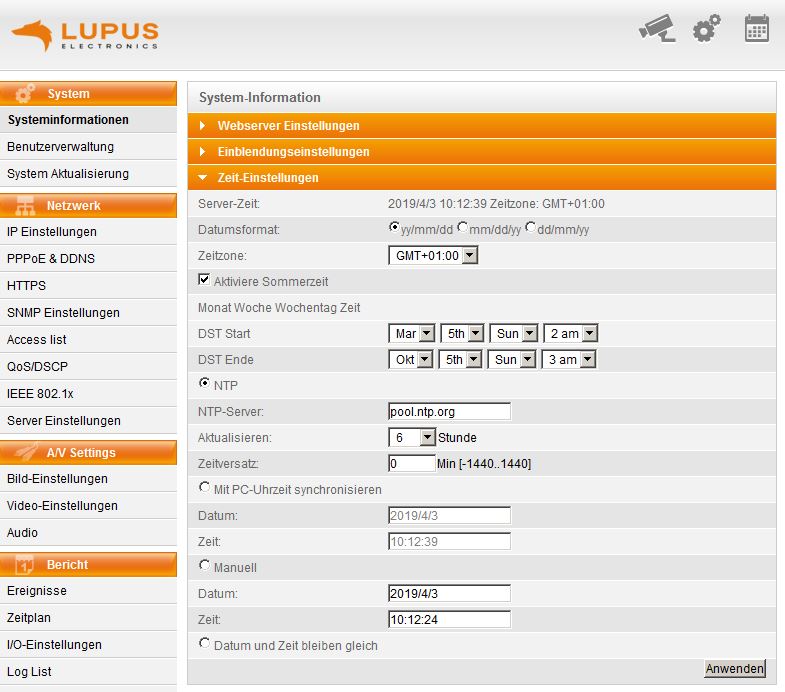
LE9xx cameras
Please use the following settings:
last updated - 28/02/2022 LE 20x / 2xx - Email Funktion per Automationsregel aktivieren / deaktivieren
Seit Firmware 3.0 verfügt die XT über eine entsprechende Automations-Aktion (Menü "Smarthome" → "Automation"). Dort können Sie Ihre IP Kamera w&auhlen und die E-Mail Benachrichtigung ein oder ausschalten
CGI-Befehl
MIT AKTUELLER FIRMWARE NICHT MEHR NOTWENDIG
1. Erstellen Sie in der XT eine neue Automationsregel.
2. Geben Sie als Aktion "Action-URL" an.
3. Verwenden Sie folgenden Befehl um die Email-Funktion zu aktivieren:
AKTIVIEREN
http://Benutzername:Passwort@IP-ADRESSEderKAMERA:PORT/cgi-bin/configManager.cgi?action=setConfig&MotionDetect[0].EventHandler.MailEnable=true
DEAKTIVIEREN:
http://Benutzername:Passwort@IP-ADRESSEderKAMERA:PORT/cgi-bin/configManager.cgi?action=setConfig&MotionDetect[0].EventHandler.MailEnable=falselast updated - 16/02/2022 LE 20x / 2xx - How do I perform a factory reset ?
Einen Hardware Reset inklusive Löschen aller Einstellungen und Benutzer / Passwörter erfolgt folgendermaßen:
- Entfernen Sie die Abdeckung des SD-Kartenslots an der Kamera (bei der LE203 ist der Knopf an der Hinterseite).
- Drücken Sie im laufenden Betrieb den Knopf neben dem SD-Kartenslot für etwa 15 Sekunden.
- Sobald die grüne und die rote LED neben dem SD Kartenslot anfangen zu blinken können Sie den Knopf wieder loslassen.
- Die Kamera führt nun den Reset durch (LEDs blinken weiterhin)
- Nach etwa zwei Minute leuchtet die grüne LED und die Kamera ist wieder erreichbar.
last updated - 16/02/2022 LE 20x / 2xx - Wie kann ich über die Alarmanlage Aufnahmen der Kamera starten?
Seit Firmware 3.0 verfügt die XT über eine entsprechende Automations-Aktion (Menü "Smarthome" → "Automation"). Dort können Sie Ihre IP Kamera wählen und eine Aufnahme starten (manuelle Aufnahme) oder stoppen (Zeitplan einhalten)
CGI-Befehl
MIT AKTUELLER FIRMWARE NICHT MEHR NOTWENDIG
1. Erstellen Sie in der XT eine Automationsregel.
2. Geben Sie als Aktion "Action-URL" an.
3. Verwenden Sie folgenden Befehl zum Aufnahmestart ("manuelle" Daueraufnahme):http://Benutzername:Passwort@IP-ADRESSEderKAMERA:PORT/cgi-bin/configManager.cgi?action=setConfig&RecordMode[0].Mode=1
4. und eine zweite Regel zum Aufnahme stoppen ("aus" - keine Aufnahmen mehr):
http://Benutzername:Passwort@IP-ADRESSEderKAMERA:PORT/cgi-bin/configManager.cgi?action=setConfig&RecordMode[0].Mode=2Alternativ können Sie zum Ausschalten auch folgenden Befehl verwenden:
http://Benutzername:Passwort@IP-ADRESSEderKAMERA:PORT/cgi-bin/configManager.cgi?action=setConfig&RecordMode[0].Mode=0
Damit stellen Sie die Kamera in den automatischen Modus und der in der Kamera hinterlegte Aufnahmezeitplan wird eingehalten.last updated - 16/02/2022 What does error code #2154 indicate?
Error code #2154 indicates that the mainstream cannot be displayed since the mainstream is set to MJPEG.
Please set the compression of the mainstream to H.264, H.264B, or H.264H in the menu "Settings" → "Camera" → "Video".
If you have integrated the camera into your XT alarm panel, please make sure that the command ends with subtype=1". Otherwise, the XT would switch the mainstream back to MJPEG.last updated - 10/12/2018 What is the function of the buttons in the iOS App?
Hier eine Auflistung der Symbole in der iOS App und deren Funktion:
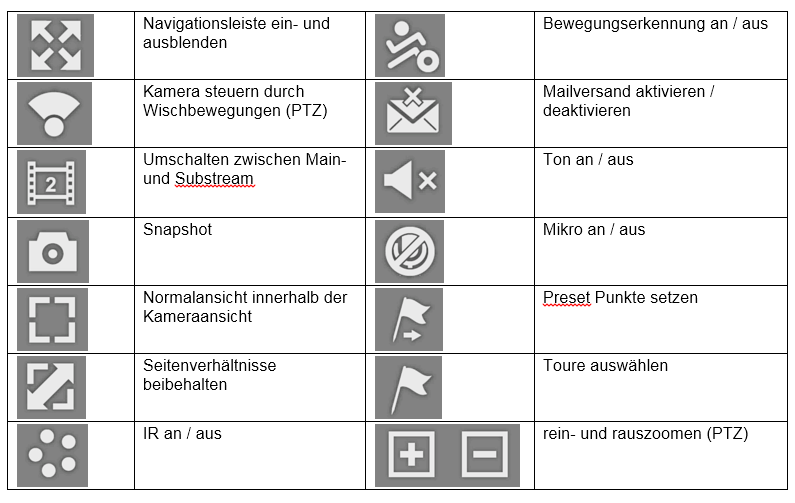
last updated - 16/09/2025 Show all FAQ's - Commentaires
-
Il n'y a aucun commentaire pour ce produit.