EAN:4260195434110
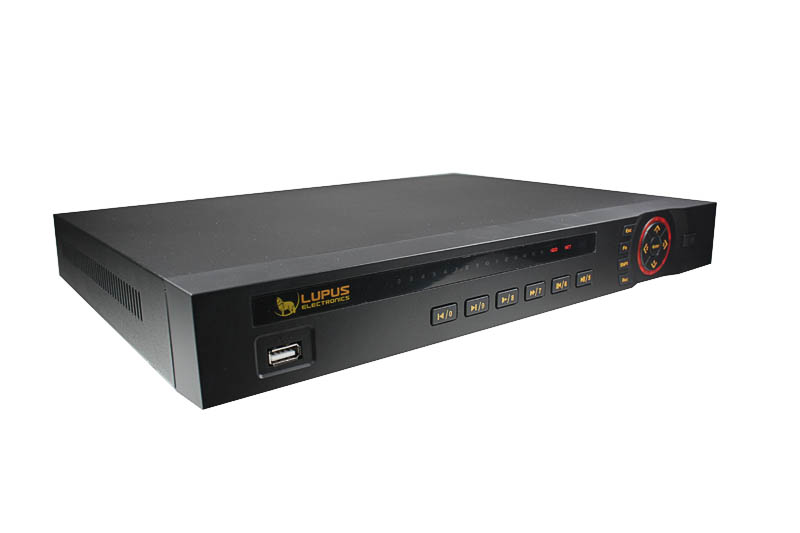
LUPUS - LE918 4k 8 Kanal NVR DVR
- Description
-
LUPUSTEC - LE918 4K network video recorder
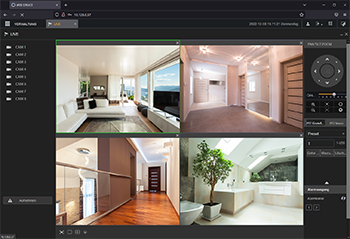 Browser interface: live view
An easy to use, all in one, and cost efficient solution
The pricing of network video recorders was very unfavourable in the past. Now, these times have passed. LUPUS-Electronics presents the latest NVRs with 8, 16, or 32 channels. Resolutions of up to 4K (ultraHD) at 25FPS are supported. If you integrate the recorder into your local network, it will record dependably time-controlled, motion-controlled, or in case of an alarm. We developed a user friendly and easy to use software. The recorder's interface (e.g. playback) features the same interface as the browser, or the included CMS software. This CMS software allows you to access all recorders of our current recorder generation. Additionally, an APP is available free of charge as well.
 The playback menu
Do not waste your time searching for options
The playback menu is structed identically in all three interfaces (recorder, browser, client software). If you know how to use one of them, you know how to use them all. You do not have to relearn how to operate the recorder if you change your way of controlling it.
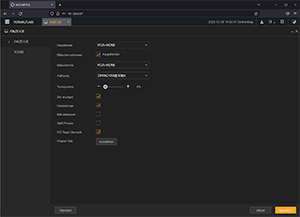 The options menu (browser)
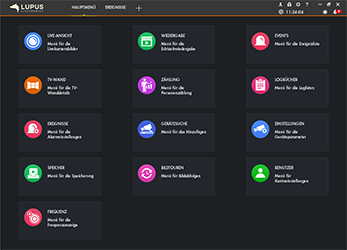
All options are clearly arranged
A simple and intuitive software is the core of our devices. In our NVRs you will find the clearly structed options menu that many of our customers already know from our IP camera series.
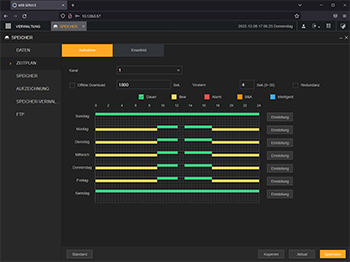 The schedule menu - simple and unambiguous
Setting a schedule
Following the slogan "no ambiguities," we focused on developing a user friendly interface that is completely unambiguous and intuitive to use.
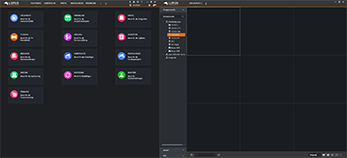
Included free of charge: the SmartVision software for MacOS and Windows
Multi monitor support: for any number of monitors...- Multi monitor support: for any number of monitors. Arrange your images / windows via Drag&Drop
- Modern touch-screen control is possible
- The software features a similar interface as the recorder and your webbrowser
- Intigration into our XT alarm panels is possible
- All windows are moveable

Configuration of all connected recorders is possible!
Intelligent recordings
Intelligent event and motion recordings will alarm you dependably if something occurs. You can divide the image in various zones and define under which circumstances a recording is started or an alarm is triggered.
 Multi monitor support
Cascadable: no matter if you use it privately or commercially!
You can adapt the SmartVision software to your individual needs. Via drag&drop you can organise the windows to fit to your monitor setup - no matter how many monitors you use.
 Simple alarm control
Predefined video pop-ups
With a few clicks, you can define when and how a motion detection or alarm recording should take place. The well-arranged chart allows you to quickly view and evaluate all incoming alarms of all connected devices.
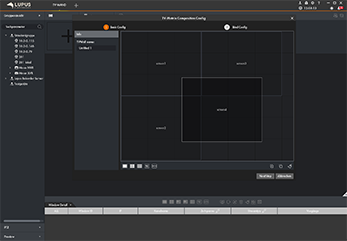 Video wall options: easy monitor setup
You can individually arrange all cameras on your available monitors
Our recorders can easily be configurated in the SmartVision software. Without being a technical professional, you can setup an impressive video wall.
 Touch-screen support
Touch-screen support and alterable window size
The LUPUS SmartVision software allows you to individually configurate all of the available option-windows on all your monitors. Just add an option window and drag it via mouse or touch-screen to your desired position.
 Alarm control
Easy control of all incoming alarms of all your recorders
The alarm menu of the LUPUS SmartVision allows you to supervise all connected recorders. The incoming alarms will be listed chronologically and, if you want to, you can even switch immidiately to the live view of the individual camera.
 iPhone + Android APP
Free of charge: iPhone and Android APP
The free of charge iPhone and Android APP "SmartVision" allows you to watch the live stream of your cameras, to view the recodings, and to begin an audio transmission.
This APP is compatible with our new LUPUS recorders.You can download the free APP in the following stores:
- Tech. Data
-
LUPUS - LE918 4k 8 Kanal NVR DVR
System
NVR Mode Multiplex Max. amount of IP cameras 8 (LE 918 4K) Supported camera resolutions 8MP/ 6MP/ 5MP/ 4MP/ 3MP/ 1080P/ 1.3MP/ 720P etc. Maximal record and playback speed Max. 25FPS (PAL), 30FPS (NTSC) per channel ! Display modes 1,4, 8, 9 ( Video output 1 x HDMI (max. 3840×2160 pixels),1 x VGA (max. 1280 x 1024 pixels)
Maximal 2x4K or 8x1080p per HDMICPU Quad-Core OS Embedded Linux Compression format H.265, H.264, MJPG Recording rate 160Mbps; 16kbps - 20Mbps per channel Recording modes Manual, scheduled, alarm triggered, video connection loss Motion detection and alarm
Action at alarm or motion detection Record, PTZ, guard tour, alarm output, push video, Email, FTP, Buzzer, and onscreen message Alarm inputs 4 Alarm outputs 2 (1x potential-free, 1x 12V) Playback and backup
Playback modes Play, pause, stop, backwards, fast forward, slow-motion, next frame, previous frame, next camera, previous camera, full-screen image, repeat, random, backup selection, digital zoom Synchronous playback 1, 4, 8 Backup options USB, network Network
Connection 1 RJ-45 port (10/100/1000Mbps) Network protocol HTTP, HTTPS, TCP/IP, IPv4/IPv6, UPNP, RTSP, UDP, SMTP, NTP, DHCP, DNS, IP Filter, DDNS, FTP, Alarm Server, LUPUSNETHD search) Max. amount of users 128 Mobile access via iPhone, iPad, Android (LUPUS APP) Supported cameras LUPUS, Arecont Vision, AXIS, Bosch, Brickcom, Canon, CP Plus, Dahua, Dynacolor, Honeywell, Panasonic, Pelco, Samsung, Sanyo, Sony, Videosec, Vivotek, etc. ONVIF version ProfileT/S/G Backup
Internal storage max. 2 SATA HDDs, up to 10TB per HDD External connections
Ethernet connection 1 RJ-45 port (10/100/1000Mbps) USB 2 x (1x USB at the back, 1x USB at the front) RS-232 - RS-485 - Additional functions
Privacy masks Yes PTZ control Yes Digital zoom Yes Password protected Yes Key lock Yes Multiple languages Yes Miscellaneous
Power supply 12V/4A Power consumption approx. 10W (without HDD) Dimensions 375mm x 281mm x 56mm (14.8 inch x 11.1 inch x 2.2 inch) Working environment -10°C - 55°C (14°F ~ 131°F) Weight 1.6kg (3.5 pounds)(without HDD) - Downloads
-
DesignationTypeSizeDateDescriptionDatenblatt - LUPUSTEC LE918 4k 8 Kanal NVR RekorderPDF1.04 MB23.5.2023Datenblatt - LUPUSTEC LE918 4k 8 Kanal NVR RekorderKonformitätserklärung - LUPUS LE 918 4KPDF292 KB19.2.2026Konformitätserklärung - LUPUS LE 918 4KUser manual - LE820, LE821, LE918 4K, LE926 4K (German)PDF7.68 MB6.2.2023User manual - LUPUS LE82X + LE918/926 4K (German) V1.4.3Software - Lupus IP Finder für WindowsZIP5.2 MB24.2.2022IP Kamera Finder zum Suchen, Einrichten und Updaten der Lupusnet HD Kameras, Rekorder + LUPUSEC Alarmzentralen Version 1.0.13Software - Lupus IP Finder für Mac OSPKG235 KB29.4.2021IP Kamera Finder zum Suchen und Einrichten der Lupusnet HD Kameras, Rekorder + LUPUSEC Alarmzentralen Version 1.3Software - SmartVision für Windows Version 2024ZIP82.07 MB29.10.2024Software - SmartVision für Windows V1.003.1005000.0.T.241021 Deutsch - Releasedatum 21.10.24Software - LUPUS SmartVision2 für MacOS VenturaGZ94.2 MB30.10.2023SmartVision Software für MacOS Ventura in Englisch. Vorraussetzung ARM Technonlogie!Software - DAV PlayerZIP12.52 MB31.3.2021DAV Player zum Abspielen von .dav-Dateien. V3.39.0.R.20160707Firmware - LE918_LE926 4k (Hardware-Version bis Verkauf Ende 2021)ZIP50.15 MB30.3.20214k Firmware V4.000.1005000.1.R 22.04.2020 - Pluginfrei!Firmware - LE918_LE926 4k (Hardware-Version ab Verkauf 2022)ZIP66.95 MB8.7.20224k_V4.001.1005001.0.R. 20.01.2022Firmware - LE918_LE926 4k (Hardware-Version ab Verkauf ab 12/2024)BIN104.59 MB25.11.2025V4.005.1005000.2.R.250911
- FAQ
-
Frequently Asked Questions - What do I have to do to get remote access to my Lupus device?
- How do I display the stream of my LE9xx 4K recorder in my XT alarm panel?
- Which App can I use?
- Why do I no longer get a live stream in my browser / Why is it no longer possible to install the plugin?
- Why can't I see the live stream of the camera / why does the camera plugin not work (64 bit browser)?
- LE 20x / 2xx - How can I find the IP address of my camera or my recorder using Windows 10?
- Why can\'t I access my recorder via webbrowser / SmartVision software?
- How can I find the IP address of my camera or my recorder using Windows 10?
- How do I set up the motion detection on my NVR?
- I cannot login into my HDTV / NVR Rekorder. (Login error - Invalid password)
- Login error after too many login attempts with a wrong user / password.
- Since I updated the Firmware I can no longer log into my recorder.
- How much storage space do I need?
- How can I display my camera / recorder in Echo Show?
- How do I correctly set-up the time / daylight saving time?
- NVR (LE 914, LE 918, LE 926, LE928) - The motion detection of my NVR does not work with my LUPUSNET HD cameras.

What do I have to do to get remote access to my Lupus device?
P2P connection
All current LUPUS devices support P2P connection. A port forwarding or DDNS address is no longer necessary if you use our app for the remote access.
Below the old and now longer necessary manuals if you still want to use port forwarding and DDNS:
How can I access my router? (Due to P2P now longer necessary)
In order to gain access to your devices via the internet, you have to set up a port forwarding in your router. In case you do not know the IP address of your router, you can find in the following way:
Windows PC MAC - Start the command interface
Type in "cmd" in the start menu (without quotation marks)- Type in “ipconfig”
- Standardgateway is the IP address of your router
- Open the system settings
- Click on network
- Select your current network connection (Ethernet or WLAN)
- The tab TCP/IP lists the IP address of your router
How do I set up a port forwarding in my router? (Due to P2P now longer necessary)
*Currently, there are only German manual availableHow do I access my device? (Due to P2P now longer necessary)
After you have created a port forwarding as described in the manuals above, you can access your device by typing in the following address in your web browser:
https://YourName.lupus-ddns.de:ExternalPortThe real command would look similar to the following:
https://demoxt2.lupus-ddns.de:53080
http://demoxt1.lupus-ddns.de:10000Which port do I need to forward in my router? (Due to P2P now longer necessary)
In the following table, the internal ports of our devices are listed:
Device Internal port XT1 / XT2 80 XT2 Plus 443 (SSL encrypted - recommended) or 80 (not encrypted) LE 9xx cameras 80 LE 200 80 (older firmware versions 88) LE 201 / LE 203 TCP 80, TCP 37777, TCP 1935, and UDP 37778 (see FAQ LUPUSTEC → General → "Required port forwarding for an access via internet") Recorder HDTV / NVR / HD-SDI TCP 80 and TCP 37777 and UDP 37778 (see FAQ LUPUSTEC → General → "Required port forwarding for an access via internet") Change the standard password of any device you allows to be accessed from the internet!
last updated - 11/27/2024 last updated - 05/29/2018 last updated - 03/17/2021 Why do I no longer get a live stream in my browser / Why is it no longer possible to install the plugin?
All of our cameras and recorders work without a plugin and display the videostream via html5. This means that you can use any modern browser to access your camera or recorder. We also have updates many of our older products that we no longer manufacture and sell.
Please check if you have the latest firmware of your product installed.:
Downloads for current products
Downloads for EOL products.In case your camera or recorder has not received a html5 update, you can still access it with Firefox ESR 52 (32 Bit), Internet Explorer 11 (32 Bit), and the 32 Bit-IE-Mode of the Edge browser.
last updated - 02/16/2022 Why can't I see the live stream of the camera / why does the camera plugin not work (64 bit browser)?
All of our cameras and recorders work without a plugin and display the videostream via html5. This means that you can use any modern browser to access your camera or recorder. We also have updates many of our older products that we no longer manufacture and sell.
Please check if you have the latest firmware of your product installed.:
Downloads for current products
Downloads for EOL products.In case your camera or recorder has not received a html5 update, you can still access it with Firefox ESR 52 (32 Bit), Internet Explorer 11 (32 Bit), and the 32 Bit-IE-Mode of the Edge browser.
In case you do not see the live stream of the camera after you have installed the plugin and restarted the browser (open the browser with right click → execute as administrator), you should check if you use a 32 bit or 64 bit browser. Currently, the camera plugin is only optimised for 32 bit browsers and cannot be run by a 64 bit browser.
In case you use a 64 bit browser, you need to install a 32 bit browser.
last updated - 02/16/2022 LE 20x / 2xx - How can I find the IP address of my camera or my recorder using Windows 10?
Please download the latest version of our IP Finder for Windows. The latest version (at least 1.0.9) allows you to find the cameras LE 201 / LE 203, as well as, our recorders on a computer running Windows 10.
last updated - 02/16/2022 Why can\'t I access my recorder via webbrowser / SmartVision software?
We ship our recorder with a static IP addrss (192.168.1.108). You need to adjust the IP address in order to gain access to the recorder with your computer.
In order to do that, you require a mouse and a monitor that is connected directly to the recorder.
1. Rightclick to open the context menu and select Main menu.
2. Open the menu Network in the row Setting.
3. Select DHCP or asign a fixed IP address in the submenu TCP/IP.
4. Click on Apply and then on OK to save the changes
The new IP address will now be set and you can connect to the recorder via the webbrowser of you computer.
last updated - 01/17/2018 How can I find the IP address of my camera or my recorder using Windows 10?
Please download the latest version of our IP Finder for Windows. The latest version (at least 1.0.9) allows you to find the cameras LE 201 / LE 203, as well as, our recorders on a computer running Windows 10.
last updated - 02/16/2022 How do I set up the motion detection on my NVR?
Bewegungserkennung richtig Einstellen (NVR Rekorder)
Um die Bewegungserkennung der über einen Rekorder richtig einzurichten sind mehrere Schritte notwendig.
- Überprüfen Sie bitte zuerst ob auf Ihrer Kamera eine ältere Firmware installiert ist. Bei älteren Firmware Versionen ist es notwendig ein Firmware Update durchzuführen:
V(A) vor 1.0.50
VB vor 1.0.46
VC vor 1.0.24 - Im Menü "Einstellung" → "Suche" → "Suche" müssen alle Kameras mit dem Herstellerprotokoll LUPUS hinterlegt sein (bei der Kamera LE 201 kann das Privat Protokoll verwendet werden).
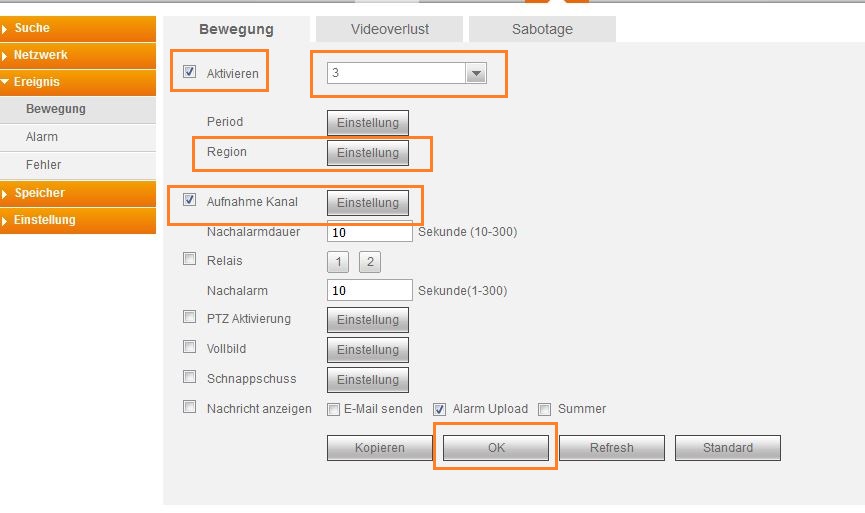
- Im Menü "Einstellung" → "Ereignis" → "Bewegung" → "Bewegung" müssen Sie nun die Kamera auswählen welche die Bewegungserkennung auslösen soll. Verwenden Sie dafür das Auswahlmenü neben dem Feld "Aktivieren".
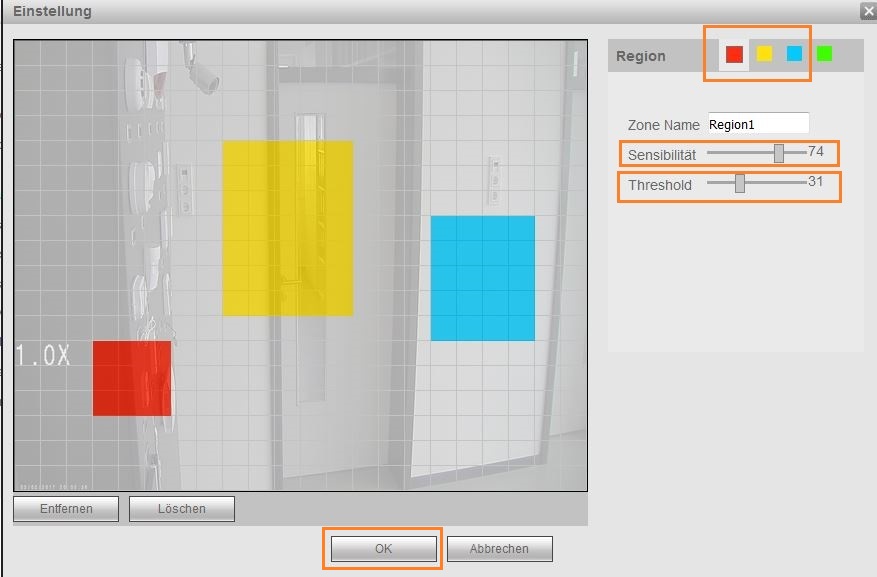
- Neben dem Punkt "Region" finden sie den Knopf "Einstellung". In dem neuen Fenster sehen Sie einen Schnappschuss des Livebilds der gewählten Kamera.
Sie können nun Bewegungsbereiche vergeben indem Sie bei Region eine Farbe auswählen und mit dieser Felder im Bild markieren. Mit Kameras der LE 9xx Serie können Sie bis zu drei verschiedene Regionen markieren.
Die Regler für "Sensibilität" und "Threshold" erlauben Ihnen festzulegen wie stark eine Bewegung sein muss.
Je höher die "Sensibilität" desto mehr Aufnahmen gibt es.
Je höher der "Threshold" desto weniger Aufnahmen gibt es.
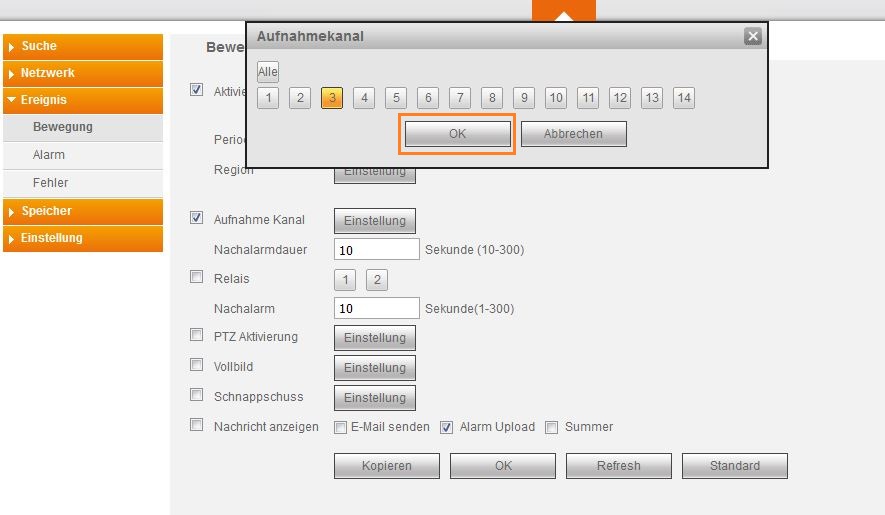
Bestätigen Sie die Einstellungen mit "OK" - Neben "Aufnahme Kanal" können Sie nun wählen welche Kamera eine Aufnahme starten soll, wenn die oben eingestellte Kamera eine Bewegung erkennt. Normalerweise wird hier dieselbe Kamera gewählt welche auch die Bewegungserkennung auslöst.
Bestätigen Sie die Wahl des Aufnahme Kanals mit "OK". - Bestätigen Sie Ihre gesamten Einstellungen mit "OK"
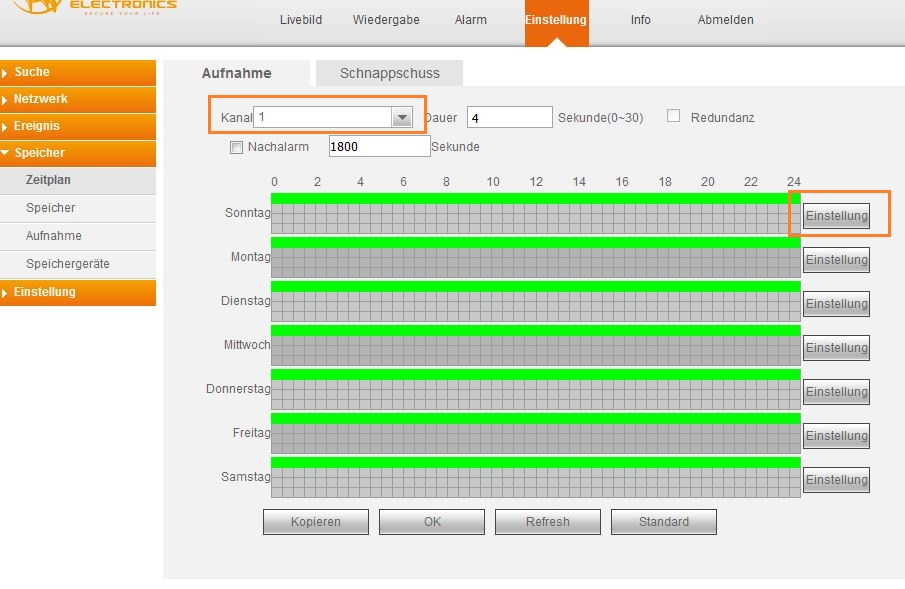
- Gehen Sie nun in das Menü "Einstellung" → "Speicher" → "Zeitplan". In diesem Menü definieren Sie ob die Kamera eine Daueraufnahme macht oder auf Bewegungen reagiert.
- Hier können Sie wieder neben Kanal die Kamera wählen für welche Sie einen Zeitplan festlegen möchten.
- Klicken Sie bei einem der Wochentage auf "Einstellung" und das folgende Menü wird erscheinen:
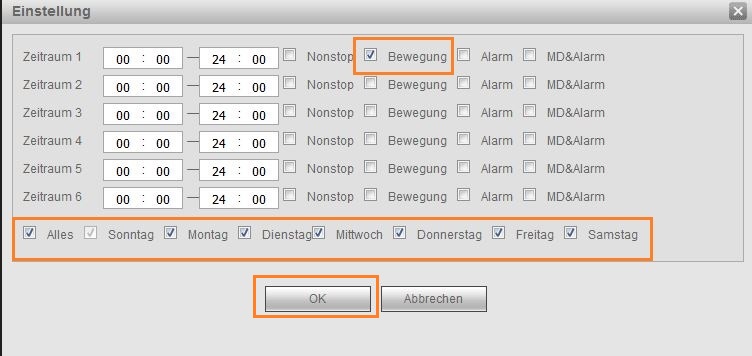
- Um die Bewegungserkennung an allen Tagen zu aktivieren, setzen Sie bitte den Haken bei "Alles" und nur bei "Bewegung". Haken bei "Nonstop", "Alarm" und "MD&Alarm" entfernen Sie bitte.
- Bestätigen Sie Ihre Einstellungen mit "OK".
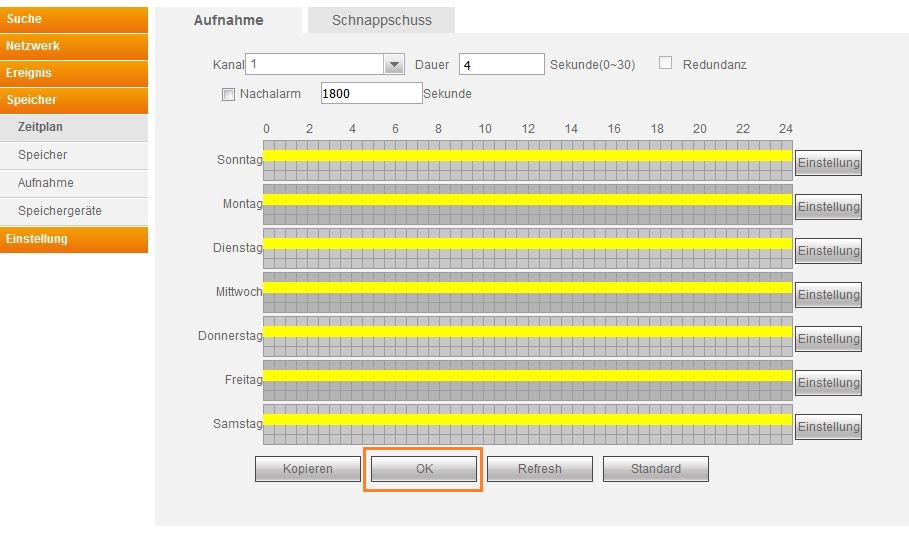
- Nun werden Ihnen an allen Tagen eine gelbe Markierung (Bewegungserkennung) angezeigt. Bestätigen Sie dies bitte mit "OK".
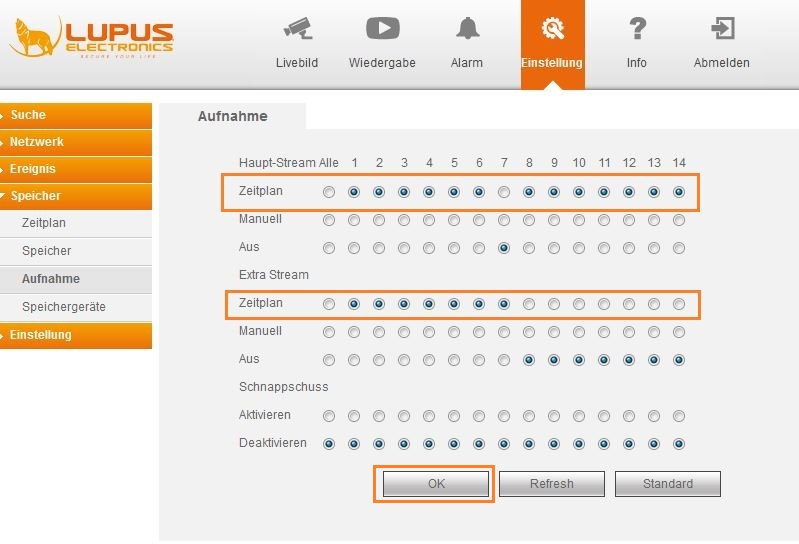
- Gehen Sie nun in das Menü "Einstellung" → "Speicher" → "Aufnahme" und stellen Sie Ihre Kameras auf Zeitplan. Erst jetzt wird die Kamera sich an den eingestellten Zeitplan halten.
- Nach Abschluss des letzten Schrittes wird die Kamera ab sofort mittels Bewegungserkennung aufnahmen auslösen.

last updated - 01/17/2018 I cannot login into my HDTV / NVR Rekorder. (Login error - Invalid password)
1. Close your browser
2. Run the install program in the following directory (64 bit system):
- C:\Program Files (x86)\webrec\WEB30\WebPlugin
Run the install program in the following directory (32 bit system):- C:\Program Files\webrec\WEB30\WebPlugin
3. Open the recorder again in your browser
4. Install the plugin
last updated - 01/17/2018 Login error after too many login attempts with a wrong user / password.
After 5 login attempts with a wrong password, the recorder locks this account.
You need to restart the recorder to unlock the account again.
In the latest firmware, the account will automatically be unlocked after 30 minutes
last updated - 01/17/2018 Since I updated the Firmware I can no longer log into my recorder.
The recorder needs to install a new version of the plugin. The old one needs to be uninstalled manually.
You can find the uninstall program in the following directory (64 bit system):
C:\Program Files (x86)\webrec\WEB30\WebPluginYou can find the uninstall program in the following directory (32 bit system):
C:\Program Files\webrec\WEB30\WebPluginlast updated - 01/17/2018 How much storage space do I need?
Please note that these are estimated record times for a continuous recording. However, the record time of a continuous recording is influenced by the amount of movement in the image - the more movement there is, the more storage space is required.
Thus, these times can only serve as an indication of the storage space you might require.
The record time is estimated for one camera with 25 frames per second.
Resolution Storage space Estimated record time 720p 32Gb 21 Stunden 1Tb 28 Tage 1080p 32Gb 9 Stunden 1Tb 12 Tage 4K 32Gb 2 Stunden 1Tb 3 Tage last updated - 01/22/2020 How can I display my camera / recorder in Echo Show?
Um unsere Kameras und Rekorder auch in Ihrem Alexa / Echo Show anzeigen zu können, gehen Sie bitte folgendermaßen vor:
Bei einem "Echo Show 5" wird von Monocle ein Gateway benötigt. Hier finden Sie die offizielle Angabe von Monocle cam zu dieser Thematik.
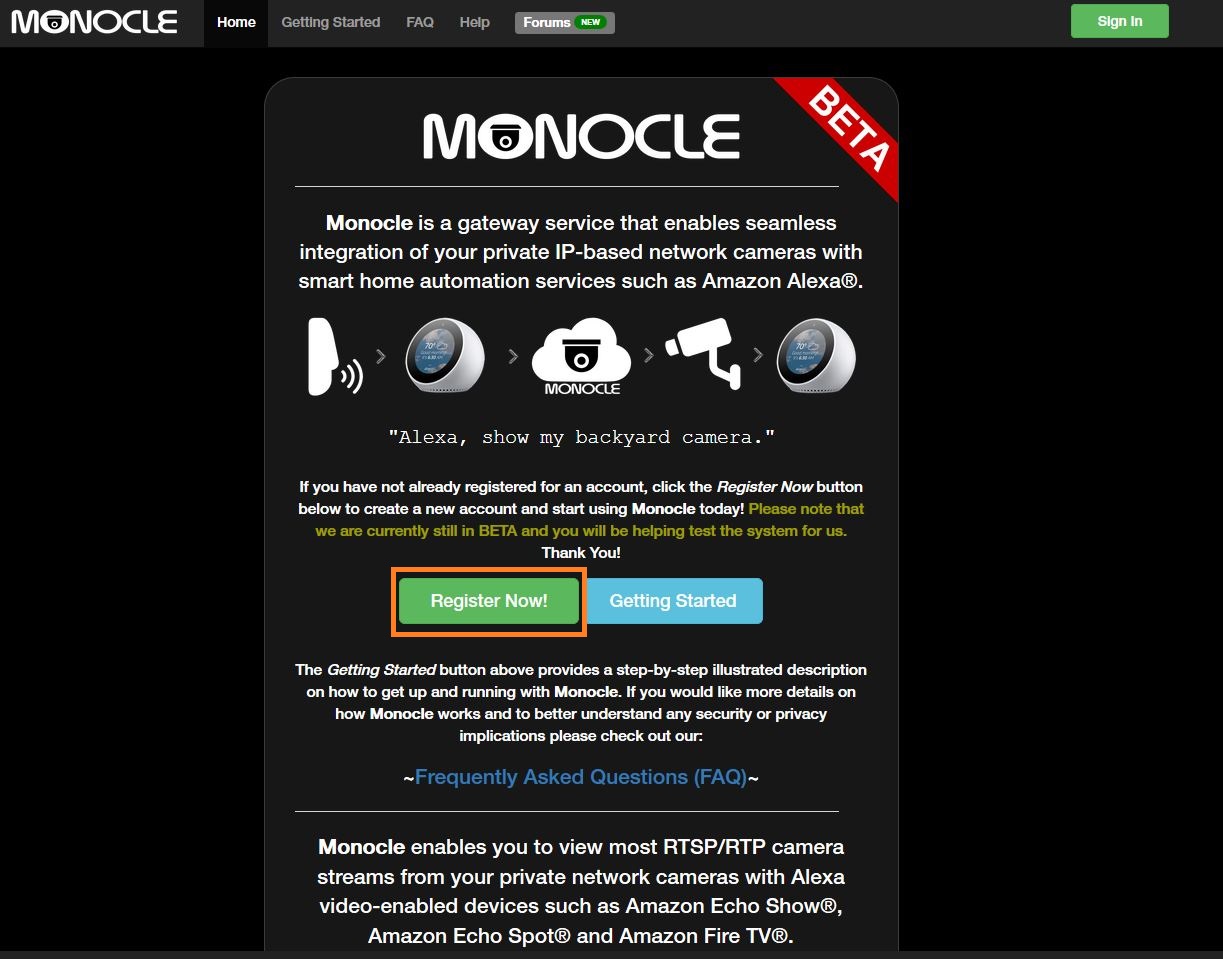
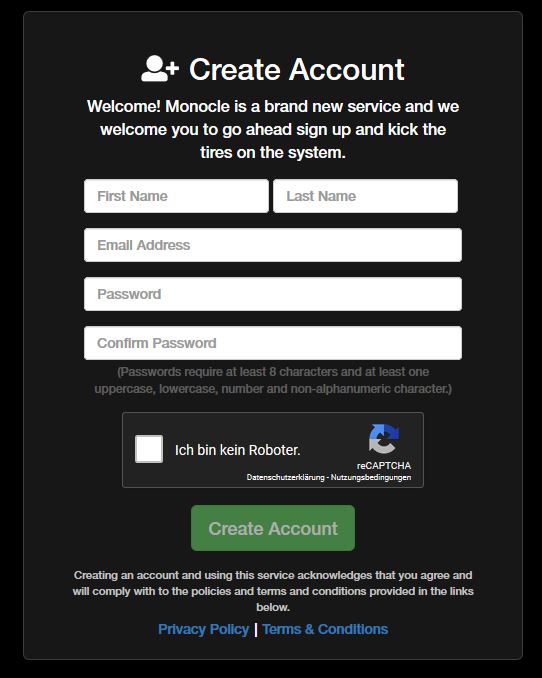
- Als erstes müssen Sie sich auf der Website www.monoclecam.com ein Konto erstellen (mittels "Register now")
- Nach der Registrierung erhalten Sie noch eine E-Mail auf der von Ihnen verwendeten Adresse. In dieser müssen Sie noch einmal bestätigen, dass Sie das Konto anlegen möchten.
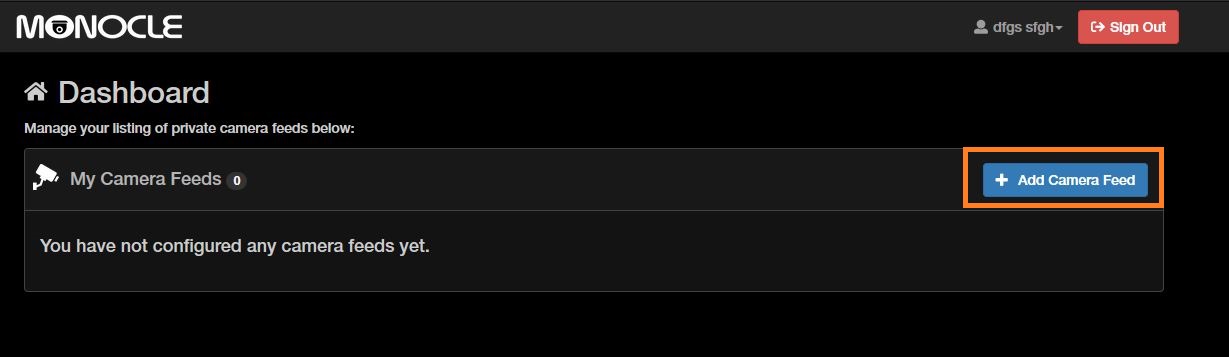
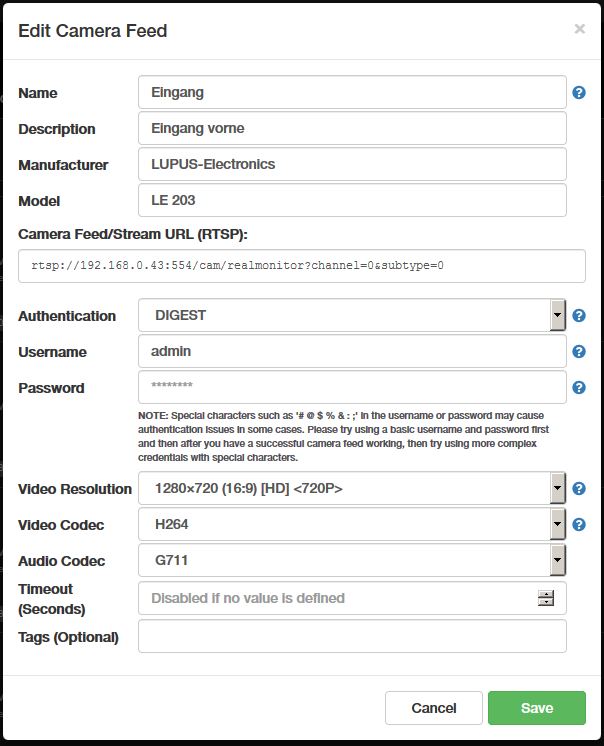
Wenn Sie sich dann per "Sign in" Angemeldet haben, sehen Sie folgende Oberfläche: - Durch klicken auf "Add camera feed" erscheint folgende Eingabemaske:
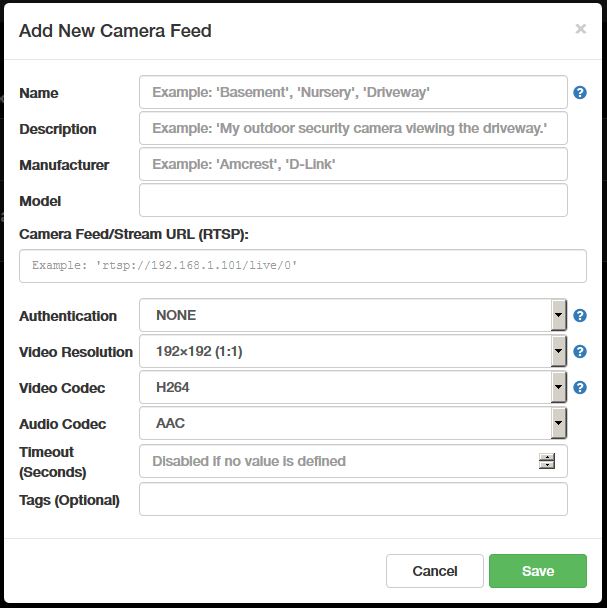
- Name: Name Ihrer Kamera (Rufname für Alexa)
- Description: Beschreibung um die Kamera besser zuordnen zu können
- Manufacturer: LUPUS-Electronics
- Model: LE 201
- Camera Feed/Stream URL (RTSP): rtsp://192.168.0.43:554/cam/realmonitor?channel=1&subtype=0
IP Adresse auf die Ihrer Kamera anpassen - Authentication: DIGEST
- Username: Benutzername Ihrer Kamera
- Password: Passwort Ihrer Kamera
- Video Resolution: "1280x720 (16:9) [HD] <720p>" (bzw. die Auflösung auf welche Sie die Kamera eingestellt haben.
- Audio Codes: "G711" (nur bei LE 203)
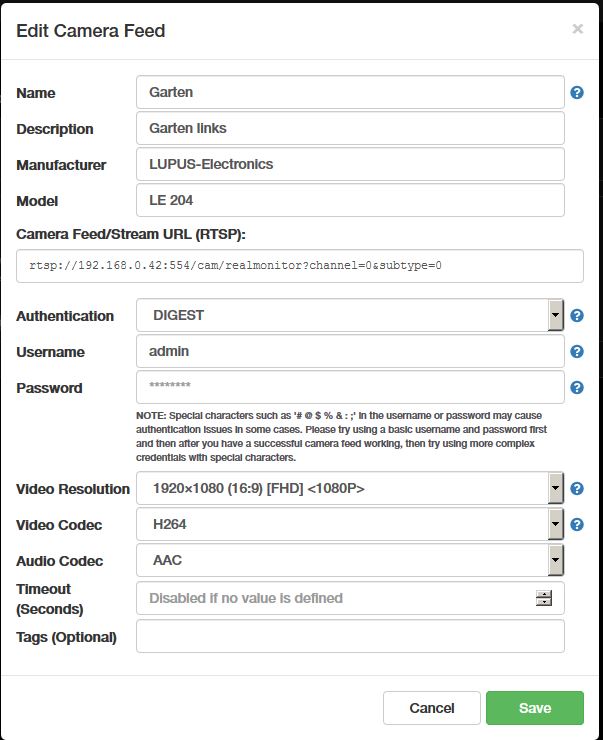
- Name: Name Ihrer Kamera (Rufname für Alexa)
- Description: Beschreibung um die Kamera besser zuordnen zu können
- Manufacturer: LUPUS-Electronics
- Model: LE 201
- Camera Feed/Stream URL (RTSP): rtsp://192.168.0.43:554/cam/realmonitor?channel=1&subtype=0
IP Adresse auf die Ihrer Kamera anpassen - Authentication: DIGEST
- Username: Benutzername Ihrer Kamera
- Password: Passwort Ihrer Kamera
- Video Resolution: "1920x1080 (16:9) [FHD] <1080P>" (bzw. die Auflösung auf welche Sie die Kamera eingestellt haben.
- Audio Codes: AAC (nicht relevant da kein Audio möglich)
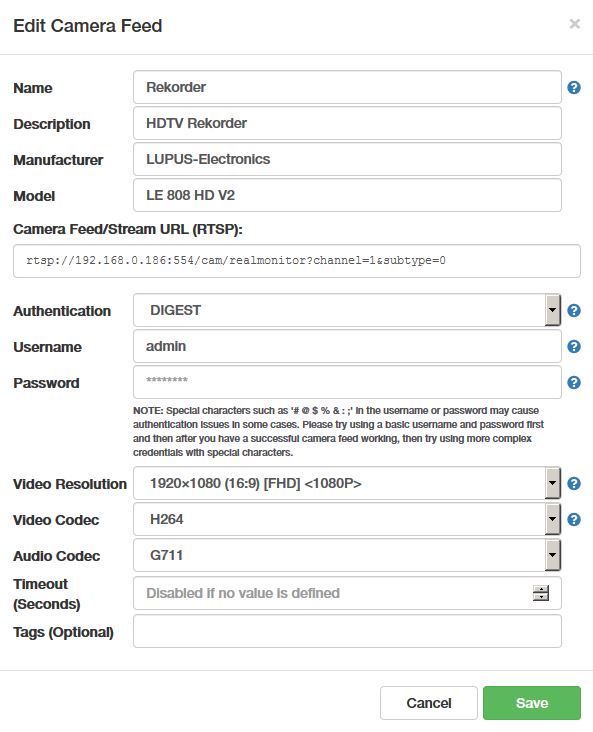
- Name: Name Ihres Rekorders (Rufname für Alexa)
- Description: Beschreibung um die Kamera besser zuordnen zu können
- Manufacturer: LUPUS-Electronics
- Model: LE 808 HD V2 (bzw. passender Name des Rekorders)
- Camera Feed/Stream URL (RTSP): rtsp://192.168.0.43:554/cam/realmonitor?channel=1&subtype=0
IP Adresse auf die Ihres Rekorers anpassen - Authentication: DIGEST
- Username: Benutzername Ihrer Kamera
- Password: Passwort Ihrer Kamera
- Video Resolution: Die Auflösung auf welche Sie die Kamera eingestellt haben.
- Audio Codes: "G711"
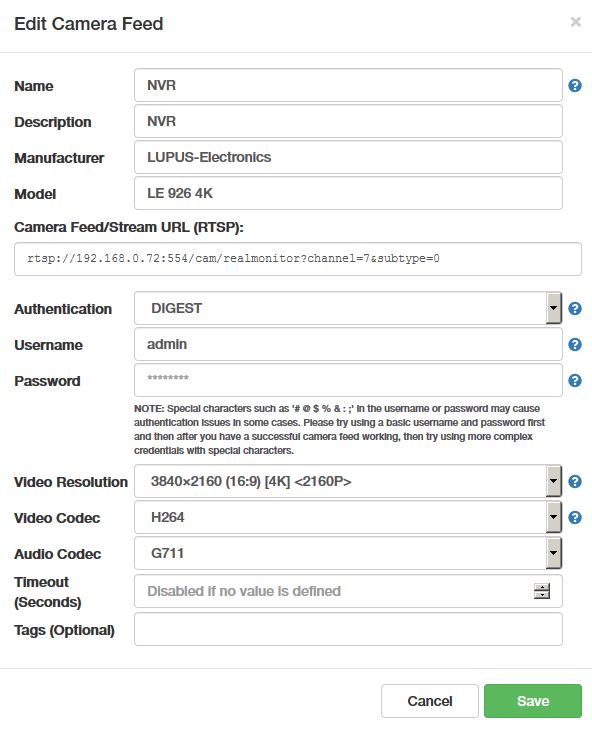
- Name: Name Ihres Rekorders (Rufname für Alexa)
- Description: Beschreibung um die Kamera besser zuordnen zu können
- Manufacturer: LUPUS-Electronics
- Model: LE 926 4K (bzw. passender Name des Rekorders)
- Camera Feed/Stream URL (RTSP): rtsp://192.168.0.43:554/cam/realmonitor?channel=1&subtype=0
IP Adresse auf die Ihres Rekorers anpassen - Authentication: DIGEST
- Username: Benutzername Ihrer Kamera
- Password: Passwort Ihrer Kamera
- Video Resolution: Die Auflösung auf welche Sie die Kamera eingestellt haben.
- Audio Codes: "G711"
- Als nächstes müssen Sie in Ihrer Alexa App nach dem "monocle" Skill suchen und diesen aktivieren.
Nach der Aktivierung müssen Sie die E-Mailadresse und das Passwort eingeben, mit welchem Sie sich auch www.monoclecam.com registriert hatten. - Wenn der Skill erfolgreich hinzugefügt wurde, klicken Sie links oben auf "Fertig" und beim Fenster danach können Sie auf "Geräte erkennen" klicken (dies dauert etwa 20 Sekunden).
- Der Monocle Skill wird Ihnen nun alle Kameras anzeigen, welche Sie Ihrem Monocle Konto hinzugefügt haben.
- An Ihrem Alexe / Echo Show können Sie nun durch Sprachbefehl "Alexa zeige Kamera [Kameraname]" Ihre Kamera Aufrufen und mittels "Alexa beendet Kamera [Kameraname] die Livebildwiedergabe beenden"
Für unsere Beispiele oben wären die Befehle also:- Zum Starten:
- "Alexa zeige Kamera Eingang"
"Alexa zeige Kamera Garage"
"Alexa zeige Kamera Garten"
usw.- "Alexa Beendet Kamera Eingang"
"Alexa Beendet Kamera Garage"
"Alexa Beendet Kamera Garten"
usw.
- LE 201 / 203:
- LE 202 / 204:
- HDTV Rekorder
- NVR
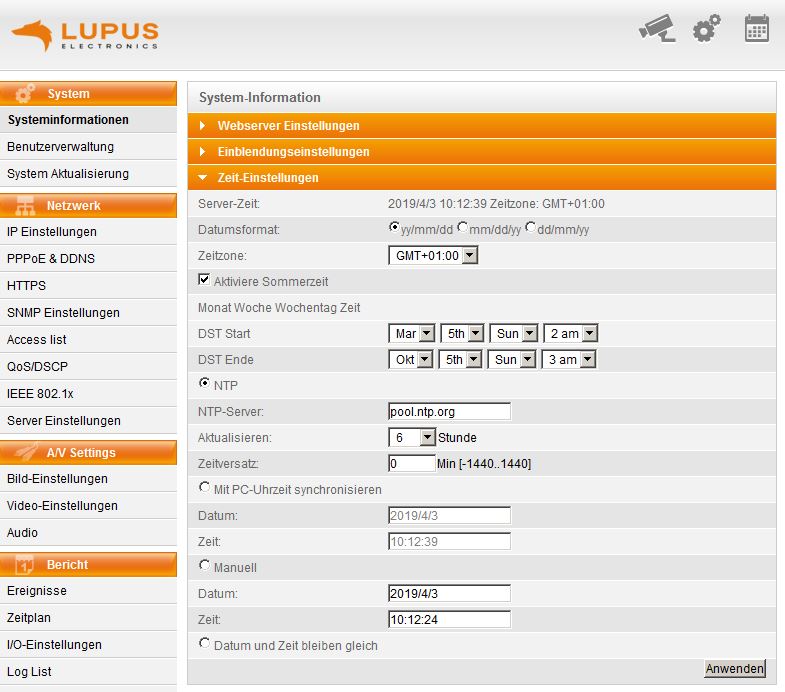
last updated - 09/30/2019 How do I correctly set-up the time / daylight saving time?
LE20x and recorder
Please use the following settings:
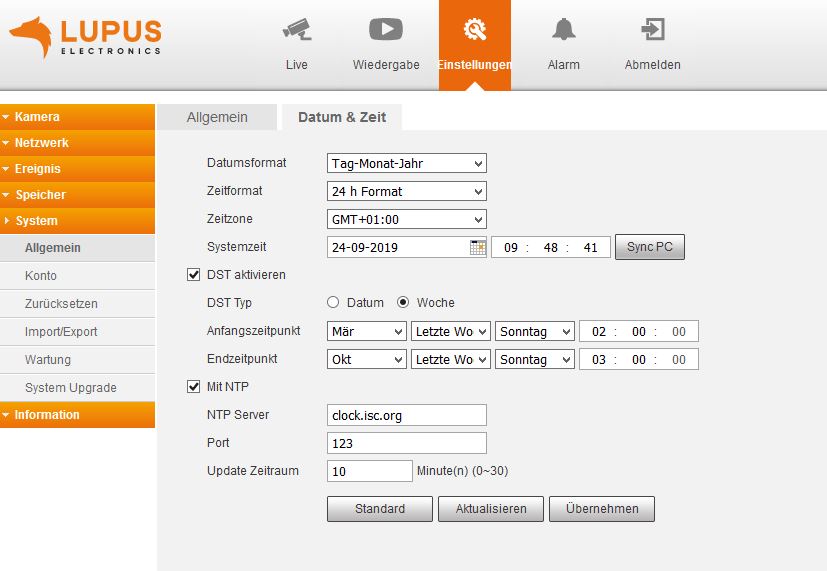
LE9xx cameras
Please use the following settings:
last updated - 02/28/2022 NVR (LE 914, LE 918, LE 926, LE928) - The motion detection of my NVR does not work with my LUPUSNET HD cameras.
Please refer to the following manual (only German version available).
last updated - 01/17/2018 Show all FAQ's - Reviews
-
There are currently no product reviews.